Barcode Scanning for WooCommerce Order Fulfilment
If you pack more than a handful of parcels a day, clicking through orders one by one wastes real time. With barcode scanning for WooCommerce, you point a scanner at the label on a box and Shop Manager finds the order instantly, and can move it to the next stage of your workflow. A basic USB scanner is all you need, and this is a free feature.
Before You Start Barcode Scanning
- The Shipping & Tracking module is switched on. It is on by default, see Shop Manager modules.
- Your parcels carry a barcode, from shipping labels printed in Shop Manager.
- Your role includes the Shipping & Tracking or the Edit Orders permission. Without one of them the Scan button does not appear.
What Scanner Do I Need?
An ordinary USB barcode scanner. The cheapest one in the shop will do. There is nothing to install and nothing to configure in Shop Manager.
Here’s the trick that makes it so simple: a barcode scanner is really just a keyboard. Plug it into a USB port and your computer treats it as one. Point it at a barcode and it “types” the number for you and presses Enter, exactly as if you had typed it yourself very fast.
When buying one, check two things:
- It reads 1D barcodes including Code 128, the type Shop Manager labels use. Nearly all of them do, and 2D scanners read 1D barcodes too.
- It sends Enter after each scan. This is the normal default. If yours doesn’t, its manual has a setup barcode you scan once to turn it on.
A Bluetooth scanner that works as a keyboard is just as good. A phone camera on its own cannot be used, because the panel reads typed input, not a camera.
No scanner yet? Try it anyway. Type an order number or tracking number into the box and press Enter. It behaves exactly the same, which is a good way to see the feature before you buy anything.
Barcode Scanning Parcels
- Go to the Orders page and click Scan at the top.
- In the Scan Parcels panel, choose what each scan should do under When I scan (see the next section).
- Scan a parcel. The scan box is already selected for you, so you don’t touch the mouse.
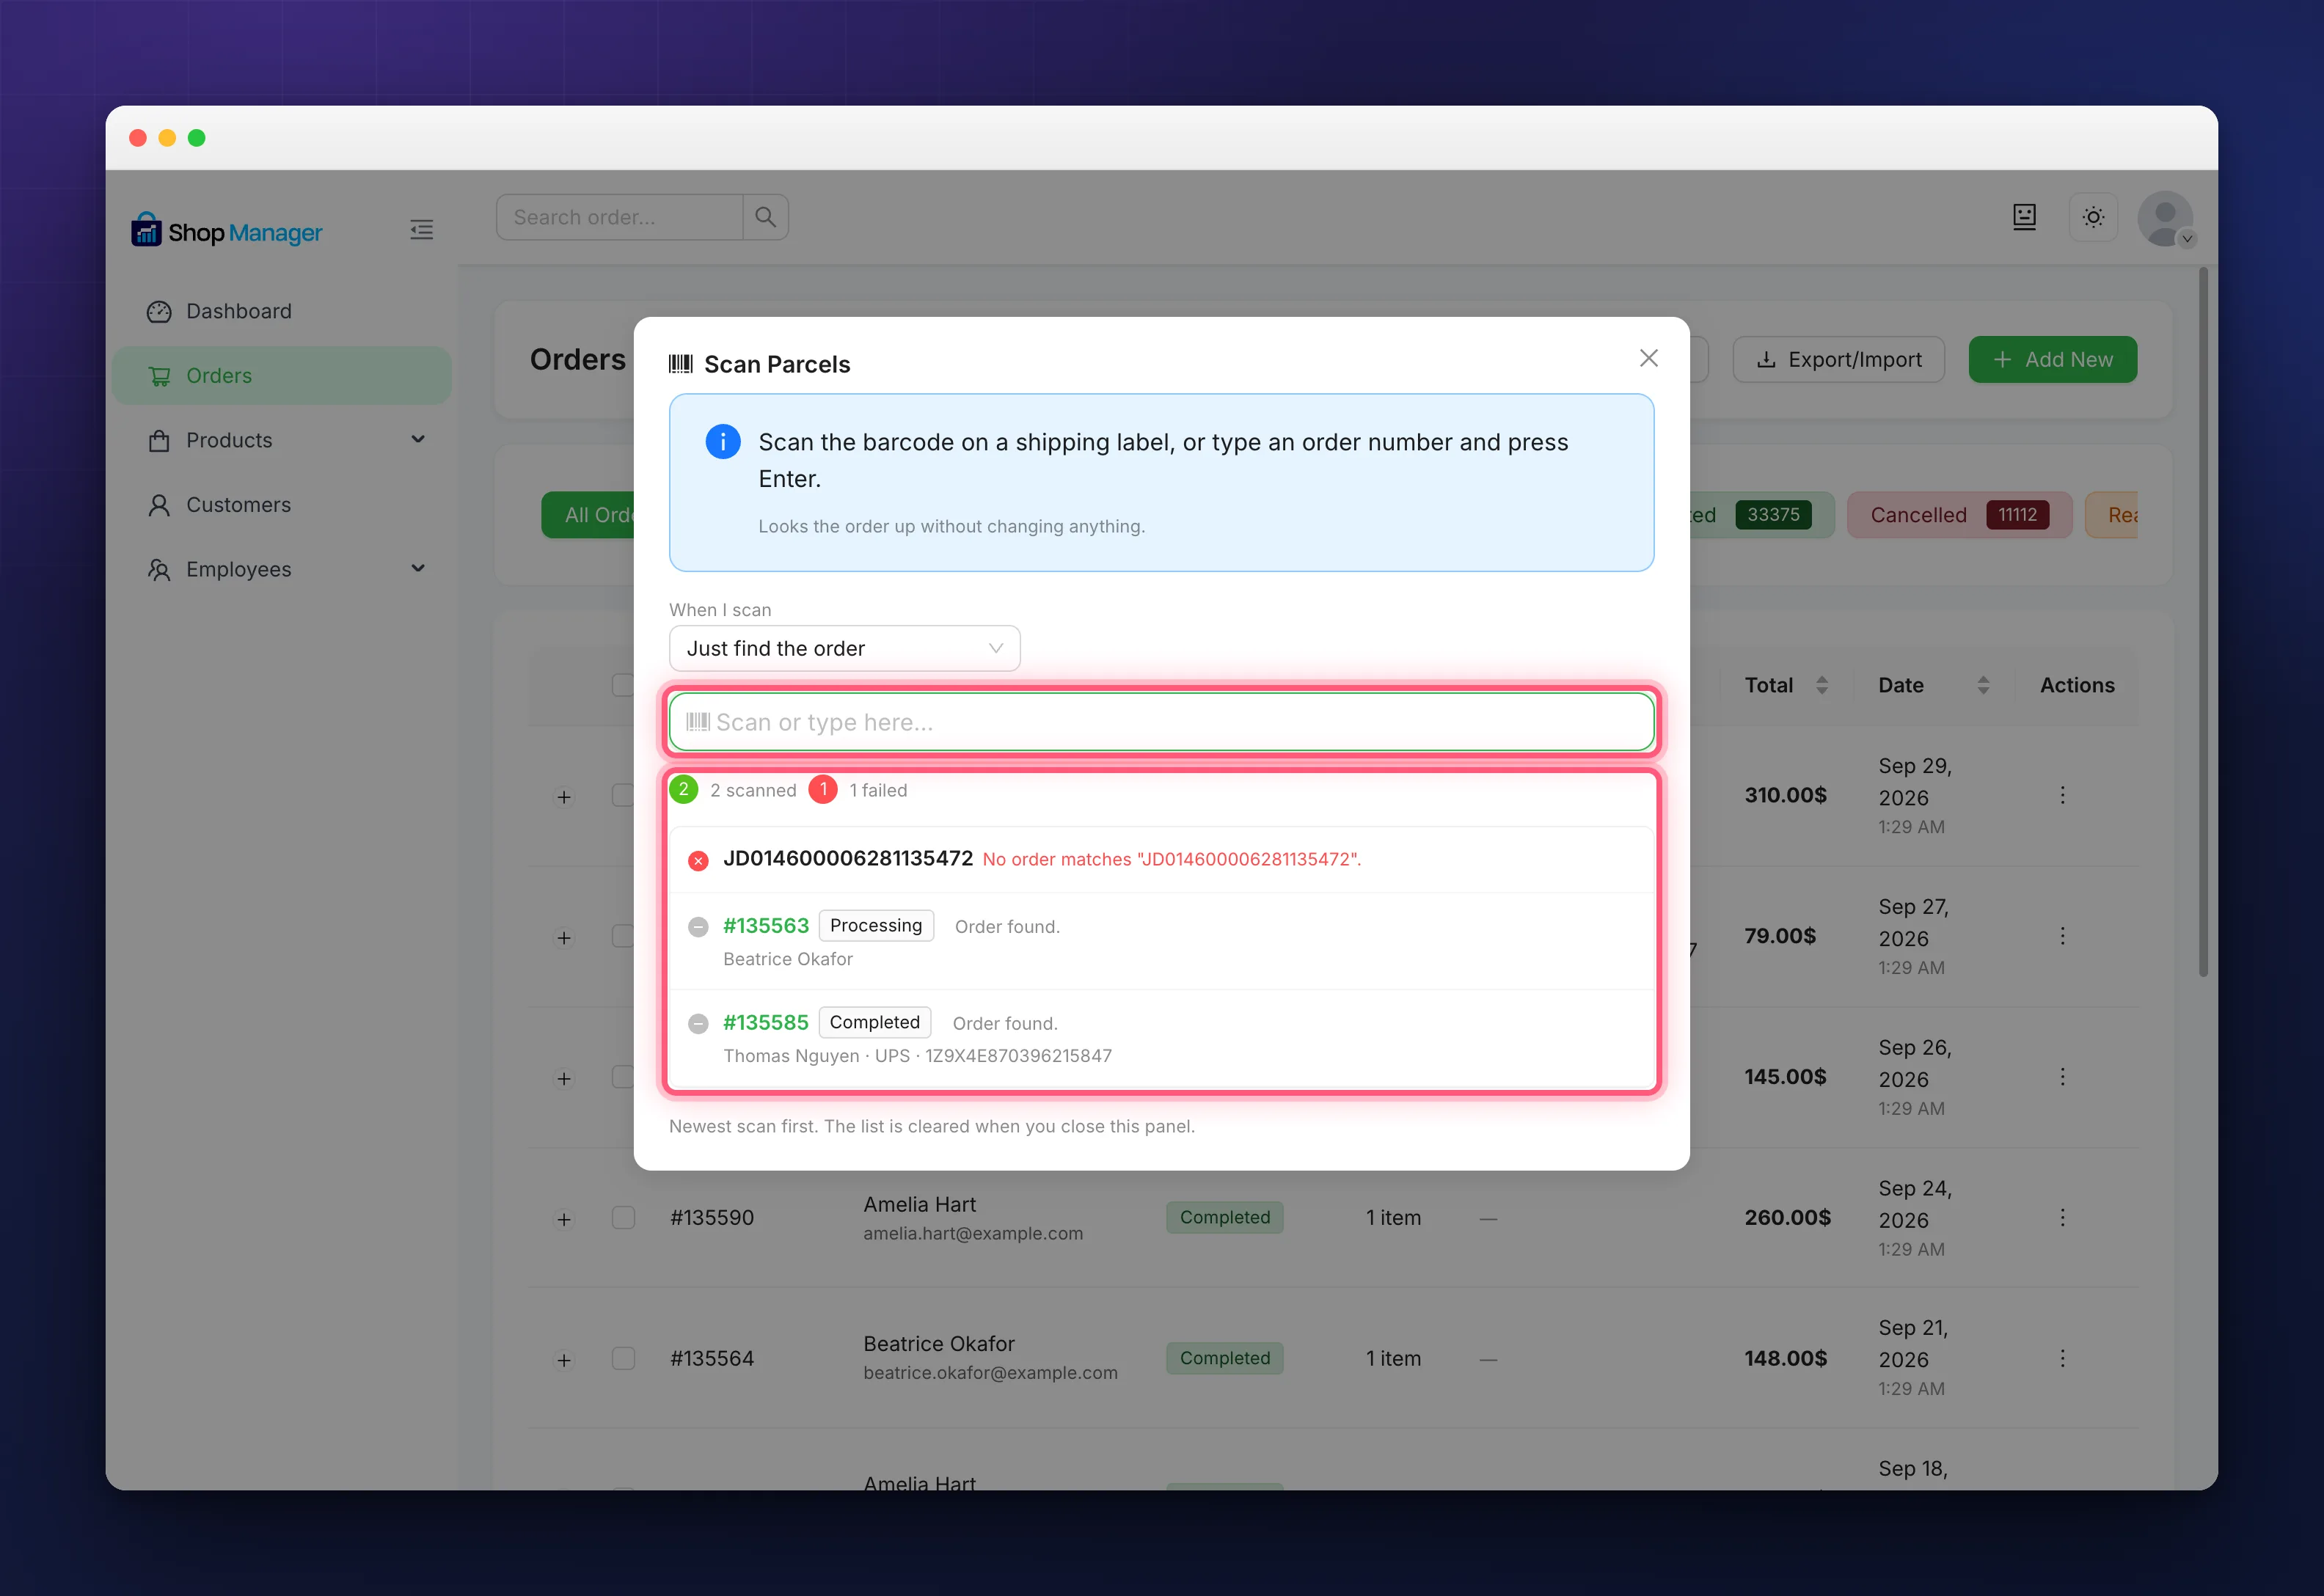
- Keep scanning. Each parcel is added to the list as you go.
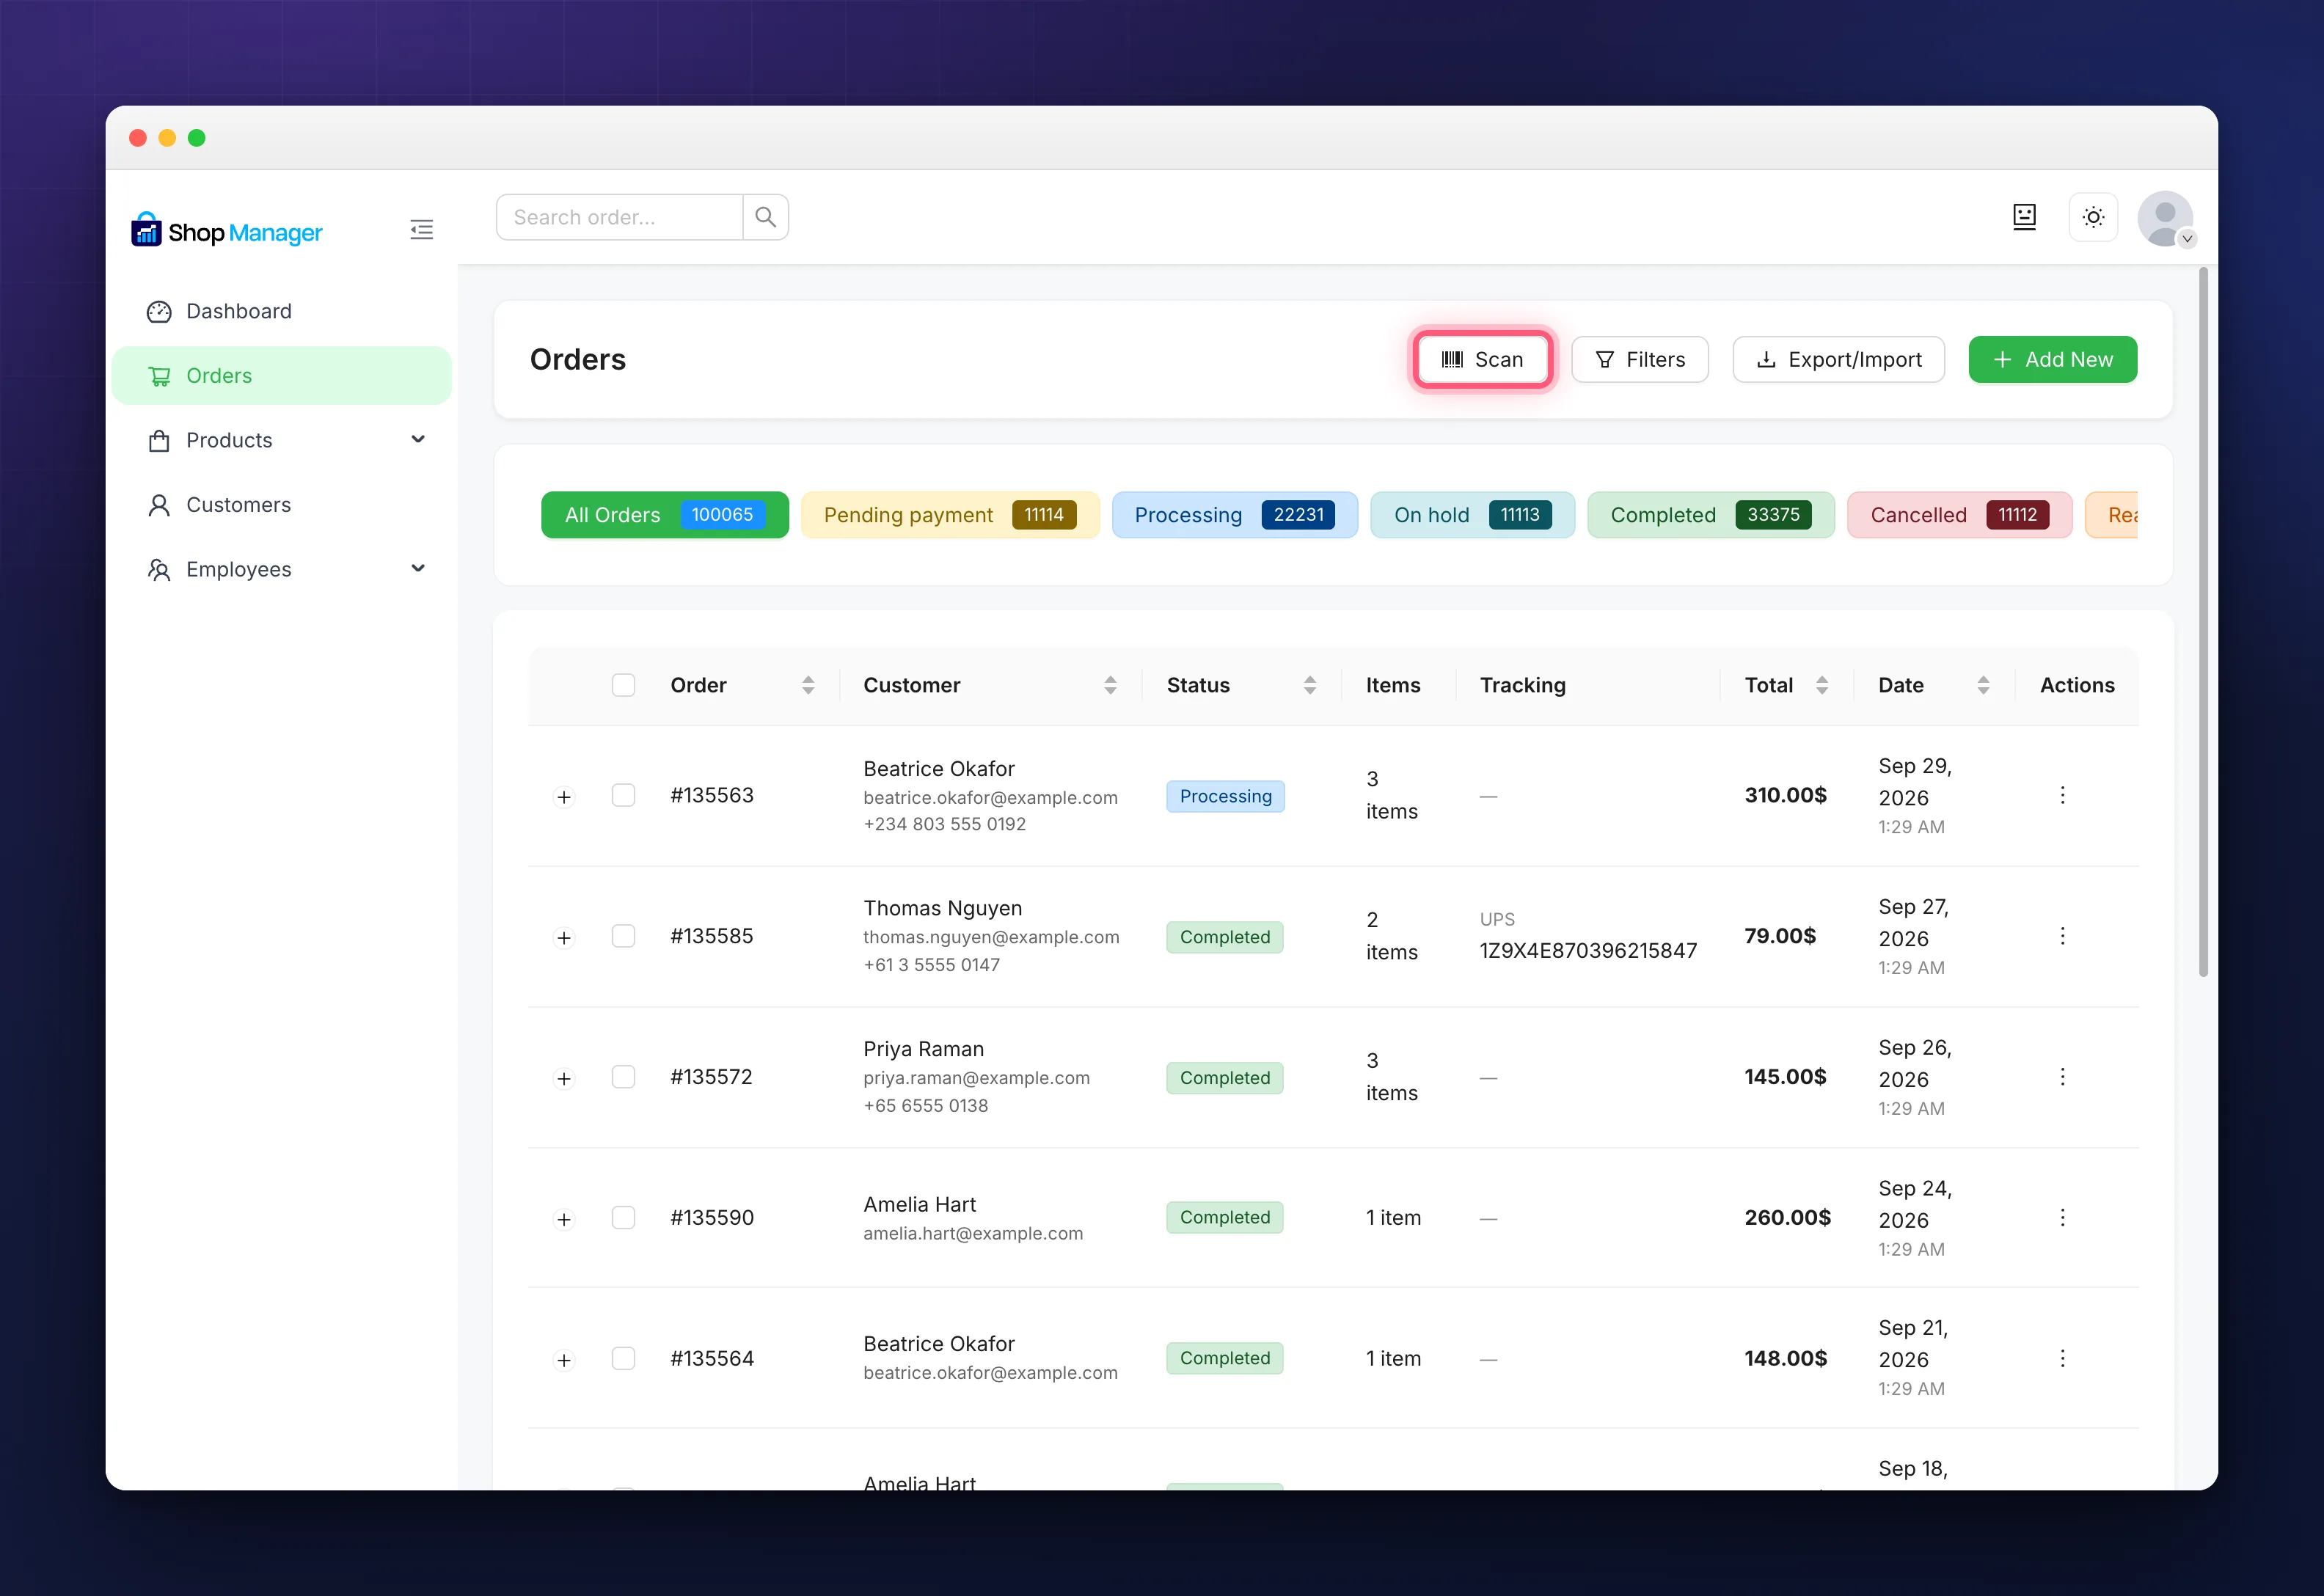
A scan can be a tracking number or an order number. Shop Manager tries the tracking number first and then the order number, so it works with any label, whether or not the parcel has tracking yet. Scans are handled one after another, even if you scan faster than the page can keep up, so a whole trolley of parcels goes through without stopping.
What Each Scan Does
Pick this once under When I scan. It applies to every scan until you change it.
| Option | What happens |
|---|---|
| Just find the order | Shows you the order and changes nothing. Good for looking something up quickly. |
| Change order status to… | Moves the order to the status you pick in the Status list, including any custom statuses you’ve created. |
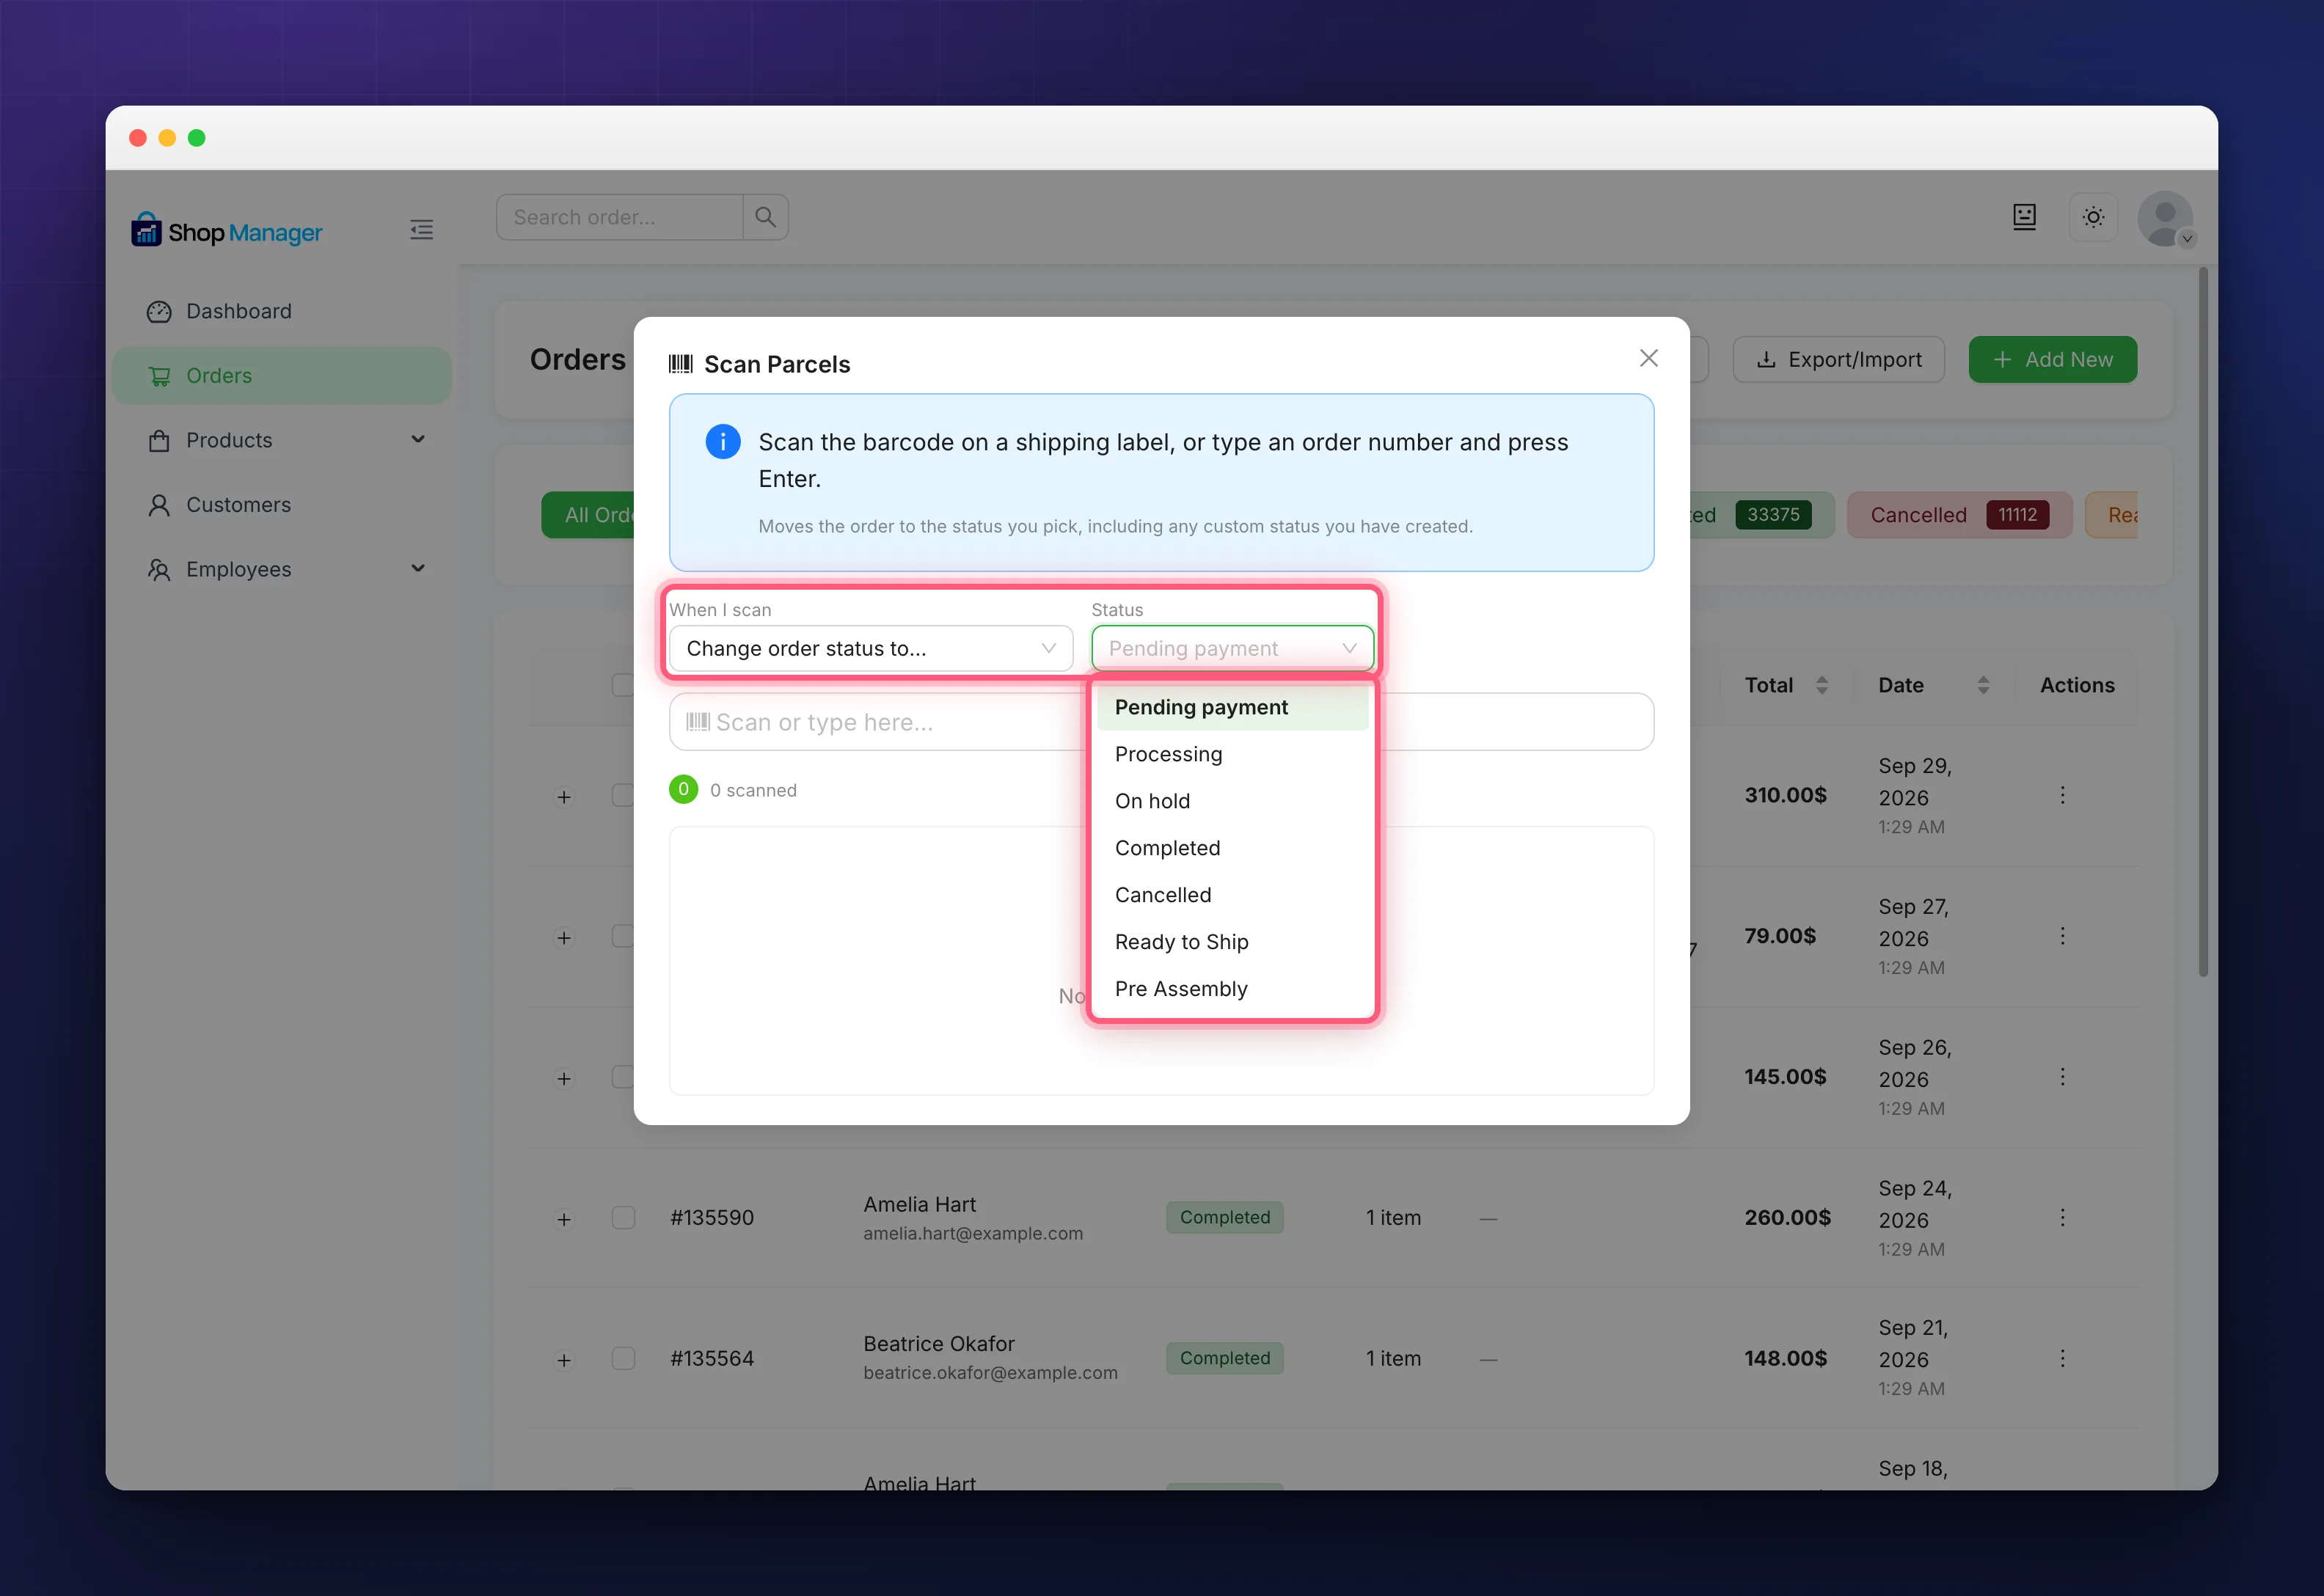
There is no separate list of parcel states to learn. The Status list shows your own order statuses, the ones on your Orders page, so whatever you call your workflow stages is what you pick here.
Check the Status before you scan. The list starts on the first status in it, Pending payment on most stores, so pick the one you actually want first. Every scan uses whatever is selected.
Reading Your Barcode Scanning Results
Every scan adds a line to the list, newest at the top, showing the order number, its status and the customer, with an icon in front:
- Green tick: done, the order was moved to the new status, for example “Moved to Ready to Ship”.
- Grey dash: nothing changed. You see this for every scan in Just find the order mode (“Order found.”), and when an order is already in the status you picked, for example “Already Completed”.
- Red cross: a problem, with a message that says what, for example “No order matches” followed by the code.
Above the list, a green count shows how many scans worked and a red count shows how many failed. At the end of a run that answers the only question that matters: did all thirty parcels go through?
Two things worth knowing:
- Scanning the same parcel twice is fine. It shows “Already” with the status rather than treating it as a mistake, because double-scanning happens constantly in a busy shop.
- A bad barcode never stops you. It’s listed in red and the next scan carries on as normal.
Each order number in the list is a link to that order. Opening it closes the panel, and the list is cleared whenever the panel closes, because it’s a tally for that run, not a permanent record. Every status change made by a scan is written into the order’s notes as “Status changed by barcode scan.”, and when a staff member scans, into their activity log as “Order Status Scanned”.
A Realistic Barcode Scanning Workflow
Here’s how the pieces fit together over a normal day:
- Morning: print your labels and stick them on the boxes. The orders stay where they are, usually Processing.
- Afternoon: the courier arrives with the day’s tracking numbers. Record them in one pass with Add Tracking for the selected orders.
- Loading: open the Scan panel, choose Change order status to…, pick the status you use for parcels that have left, then scan each box as it goes into the van.
- Done: every parcel that physically left has moved status, your customers have their tracking, and the counts prove nothing was missed.
If you’d rather keep it simple, record tracking when you hand the parcel over and use barcode scanning purely to look orders up.
Finding an Order by Its Tracking Number
You don’t always need the Scan panel. The Search order box at the top of the dashboard also finds orders by tracking number.
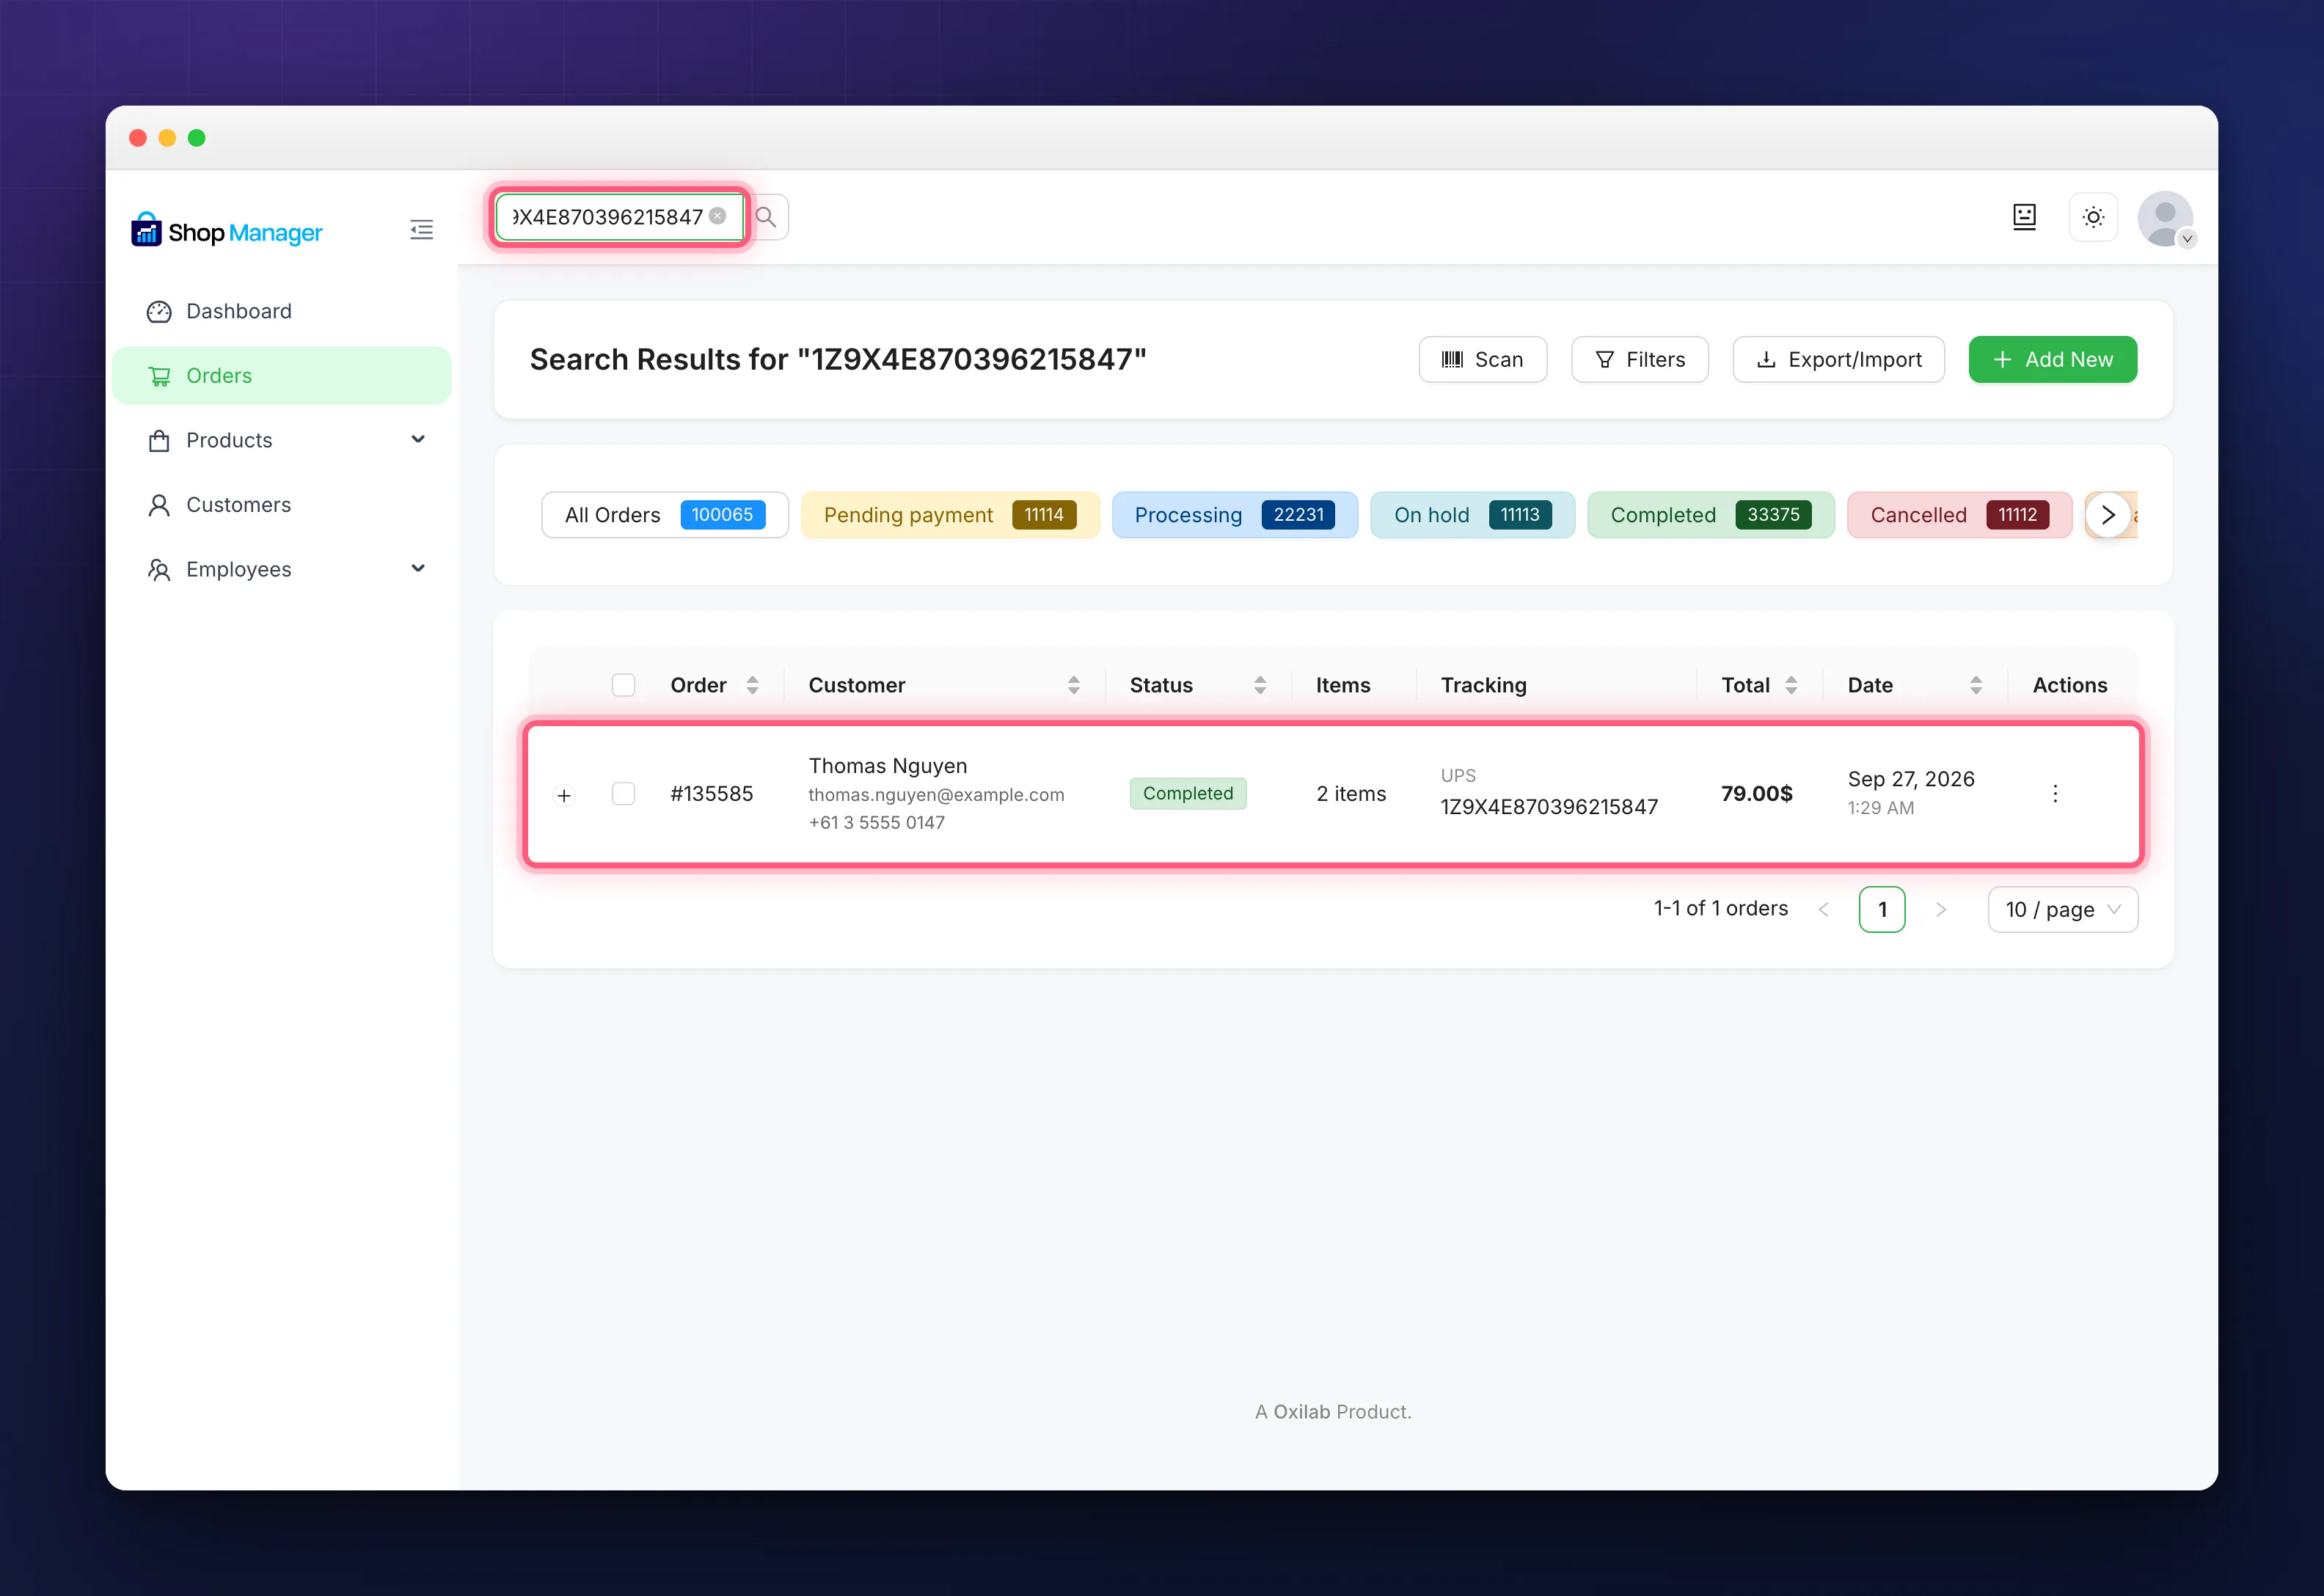
So when a customer rings and reads out a number, paste it into the search box and their order appears. Part of a number works too, as long as you type at least four characters. And because a scanner just types, you can scan a label straight into the search box to pull up its order.
Who Can Use Barcode Scanning
The Scan button, and both scan options, need the Shipping & Tracking or the Edit Orders permission. Staff who can only view orders don’t see the Scan button, but they can still look a parcel up by pasting or scanning its number into the search box.
Tip: Leave the packing computer’s browser on the Orders page with the Scan panel open, and your barcode scanning station is ready. Staff don’t need to touch the keyboard or mouse for a whole batch.