WooCommerce Order Management from the Frontend
The Orders screen is the heart of WooCommerce order management in Shop Manager. It’s where you’ll search for orders, check their status, open details, change statuses in bulk, and export your data, all from the frontend, without touching wp-admin. This guide walks through the whole free order workflow, click by click.
Creating and editing orders, custom statuses, advanced filters, and PDF invoices each have their own dedicated guides, linked at the end.
What You Need
- ✅ Shop Manager is installed and active, and you can open
/sm-dashboard/. - ✅ Your store has some WooCommerce orders.
- ✅ If you’re an employee, your role needs Orders access. Specific actions (export, status change, trash) are controlled by separate permissions.
Opening the Orders Screen
In the dashboard sidebar, click Orders. You’ll land on the full order list.
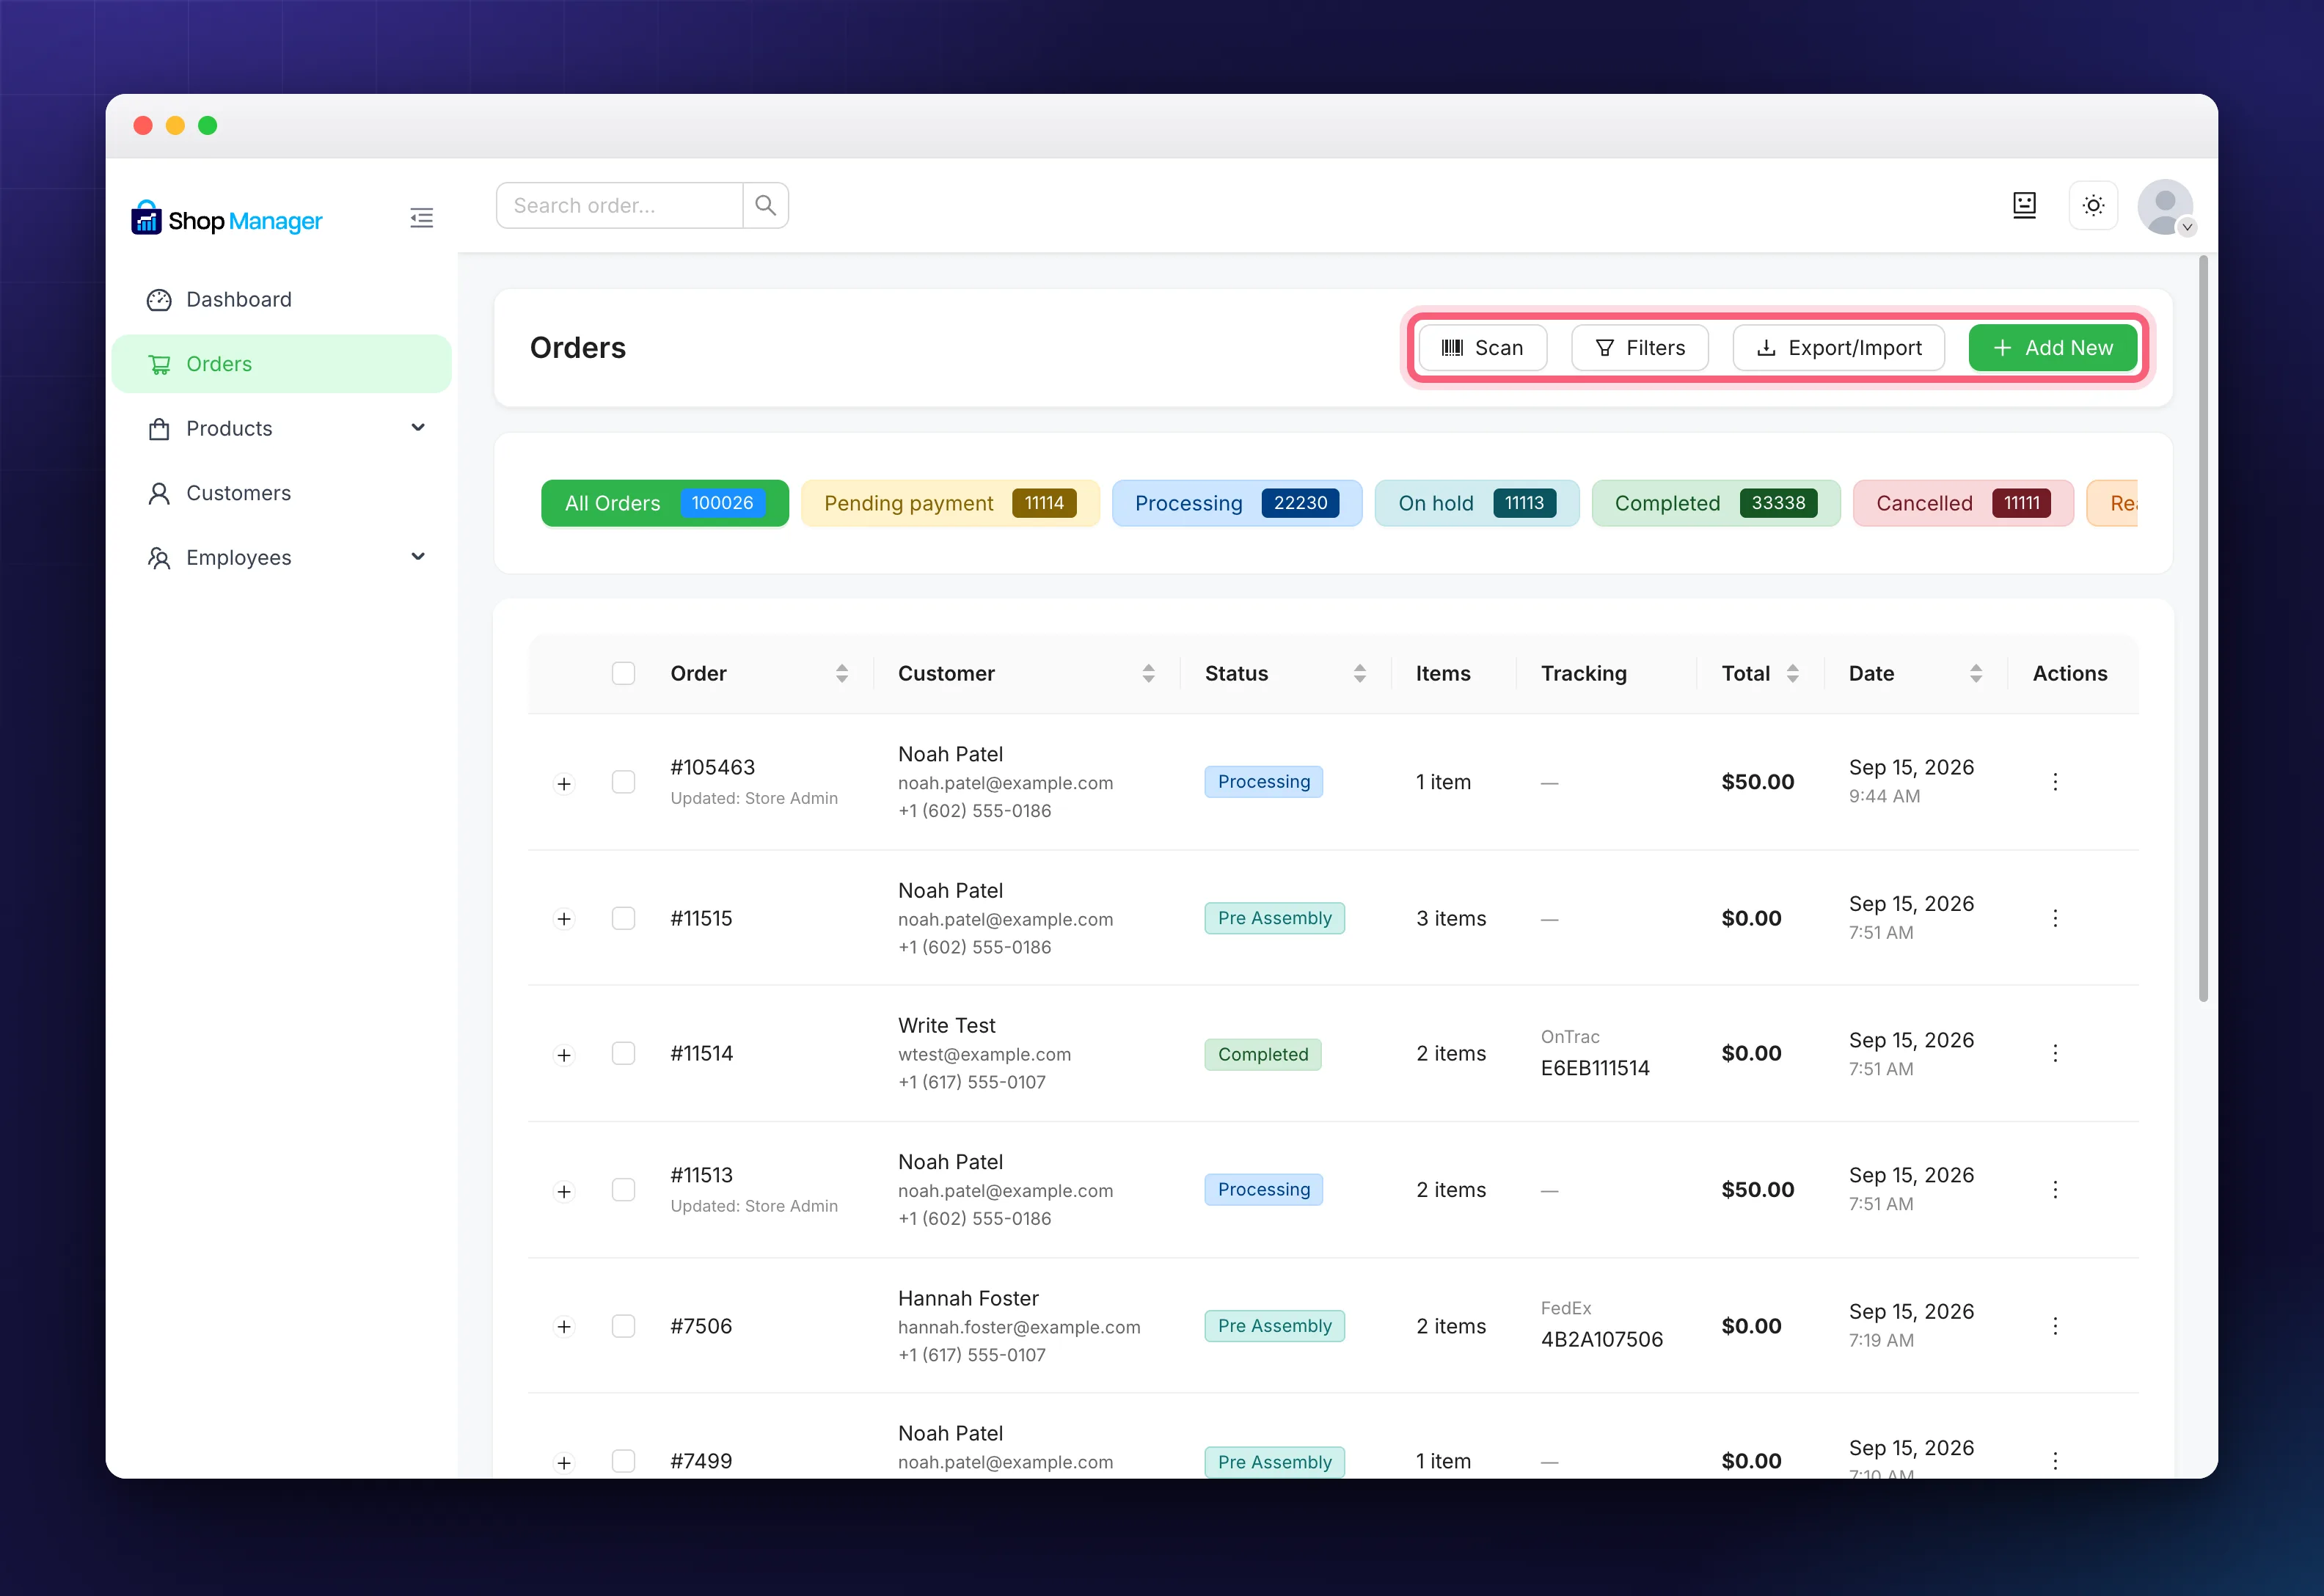
At the top right of the screen, you’ll find, depending on your permissions:
- Scan: opens a barcode scanner that jumps straight to an order. It appears when the Shipping & Tracking module is on and your role can handle shipping.
- Filters: opens advanced filtering, shown only when filters are switched on in the settings.
- Export/Import: export orders to CSV. Import is still marked “coming soon”.
- Add New: create a new order.
Reading the Orders Table
Each row is one order. The columns are Order, Customer, Status (a colored tag), Items, Tracking, Total, Date and Actions. Click a column header to sort, and use the pagination at the bottom to move through pages.
The Tracking column only appears while the Shipping & Tracking module is on, and never in Trash. An order with no shipment shows a dash, which is the state a fulfilment list needs to make obvious. Free records one shipment per order; Pro can record several and summarises the extras as a small +2 tag.
To open an order, click its number or use the row’s actions menu.
The Row Actions Menu
The three dots at the end of a row open a short menu. What it holds depends on your permissions and on the view you are in:
- View: open the order details page.
- Edit: open the order for editing.
- The print and shipping label entries, each named after your own Document Title. Neither appears for a trashed order, because a trashed order is not being despatched.
- Change Status: the same status list as the bulk menu, with custom statuses locked on the free plugin.
- Move to Trash, or Restore and Delete Permanently when you are already in Trash.
Expanding a Row
The + at the start of a row expands it in place, which saves opening the order just to check something. It has two tabs:
- Items: each product with its quantity, price and line total.
- Details: the billing and shipping addresses side by side, plus any customer note left on the order.
Status Tabs and Counts
Just below the header is a row of status tabs (a scrollable slider). Each tab, such as All Orders, Pending payment, Processing, On hold, Completed or Cancelled, shows a live count of how many orders are in that status. Click a tab to filter the list to that status instantly.
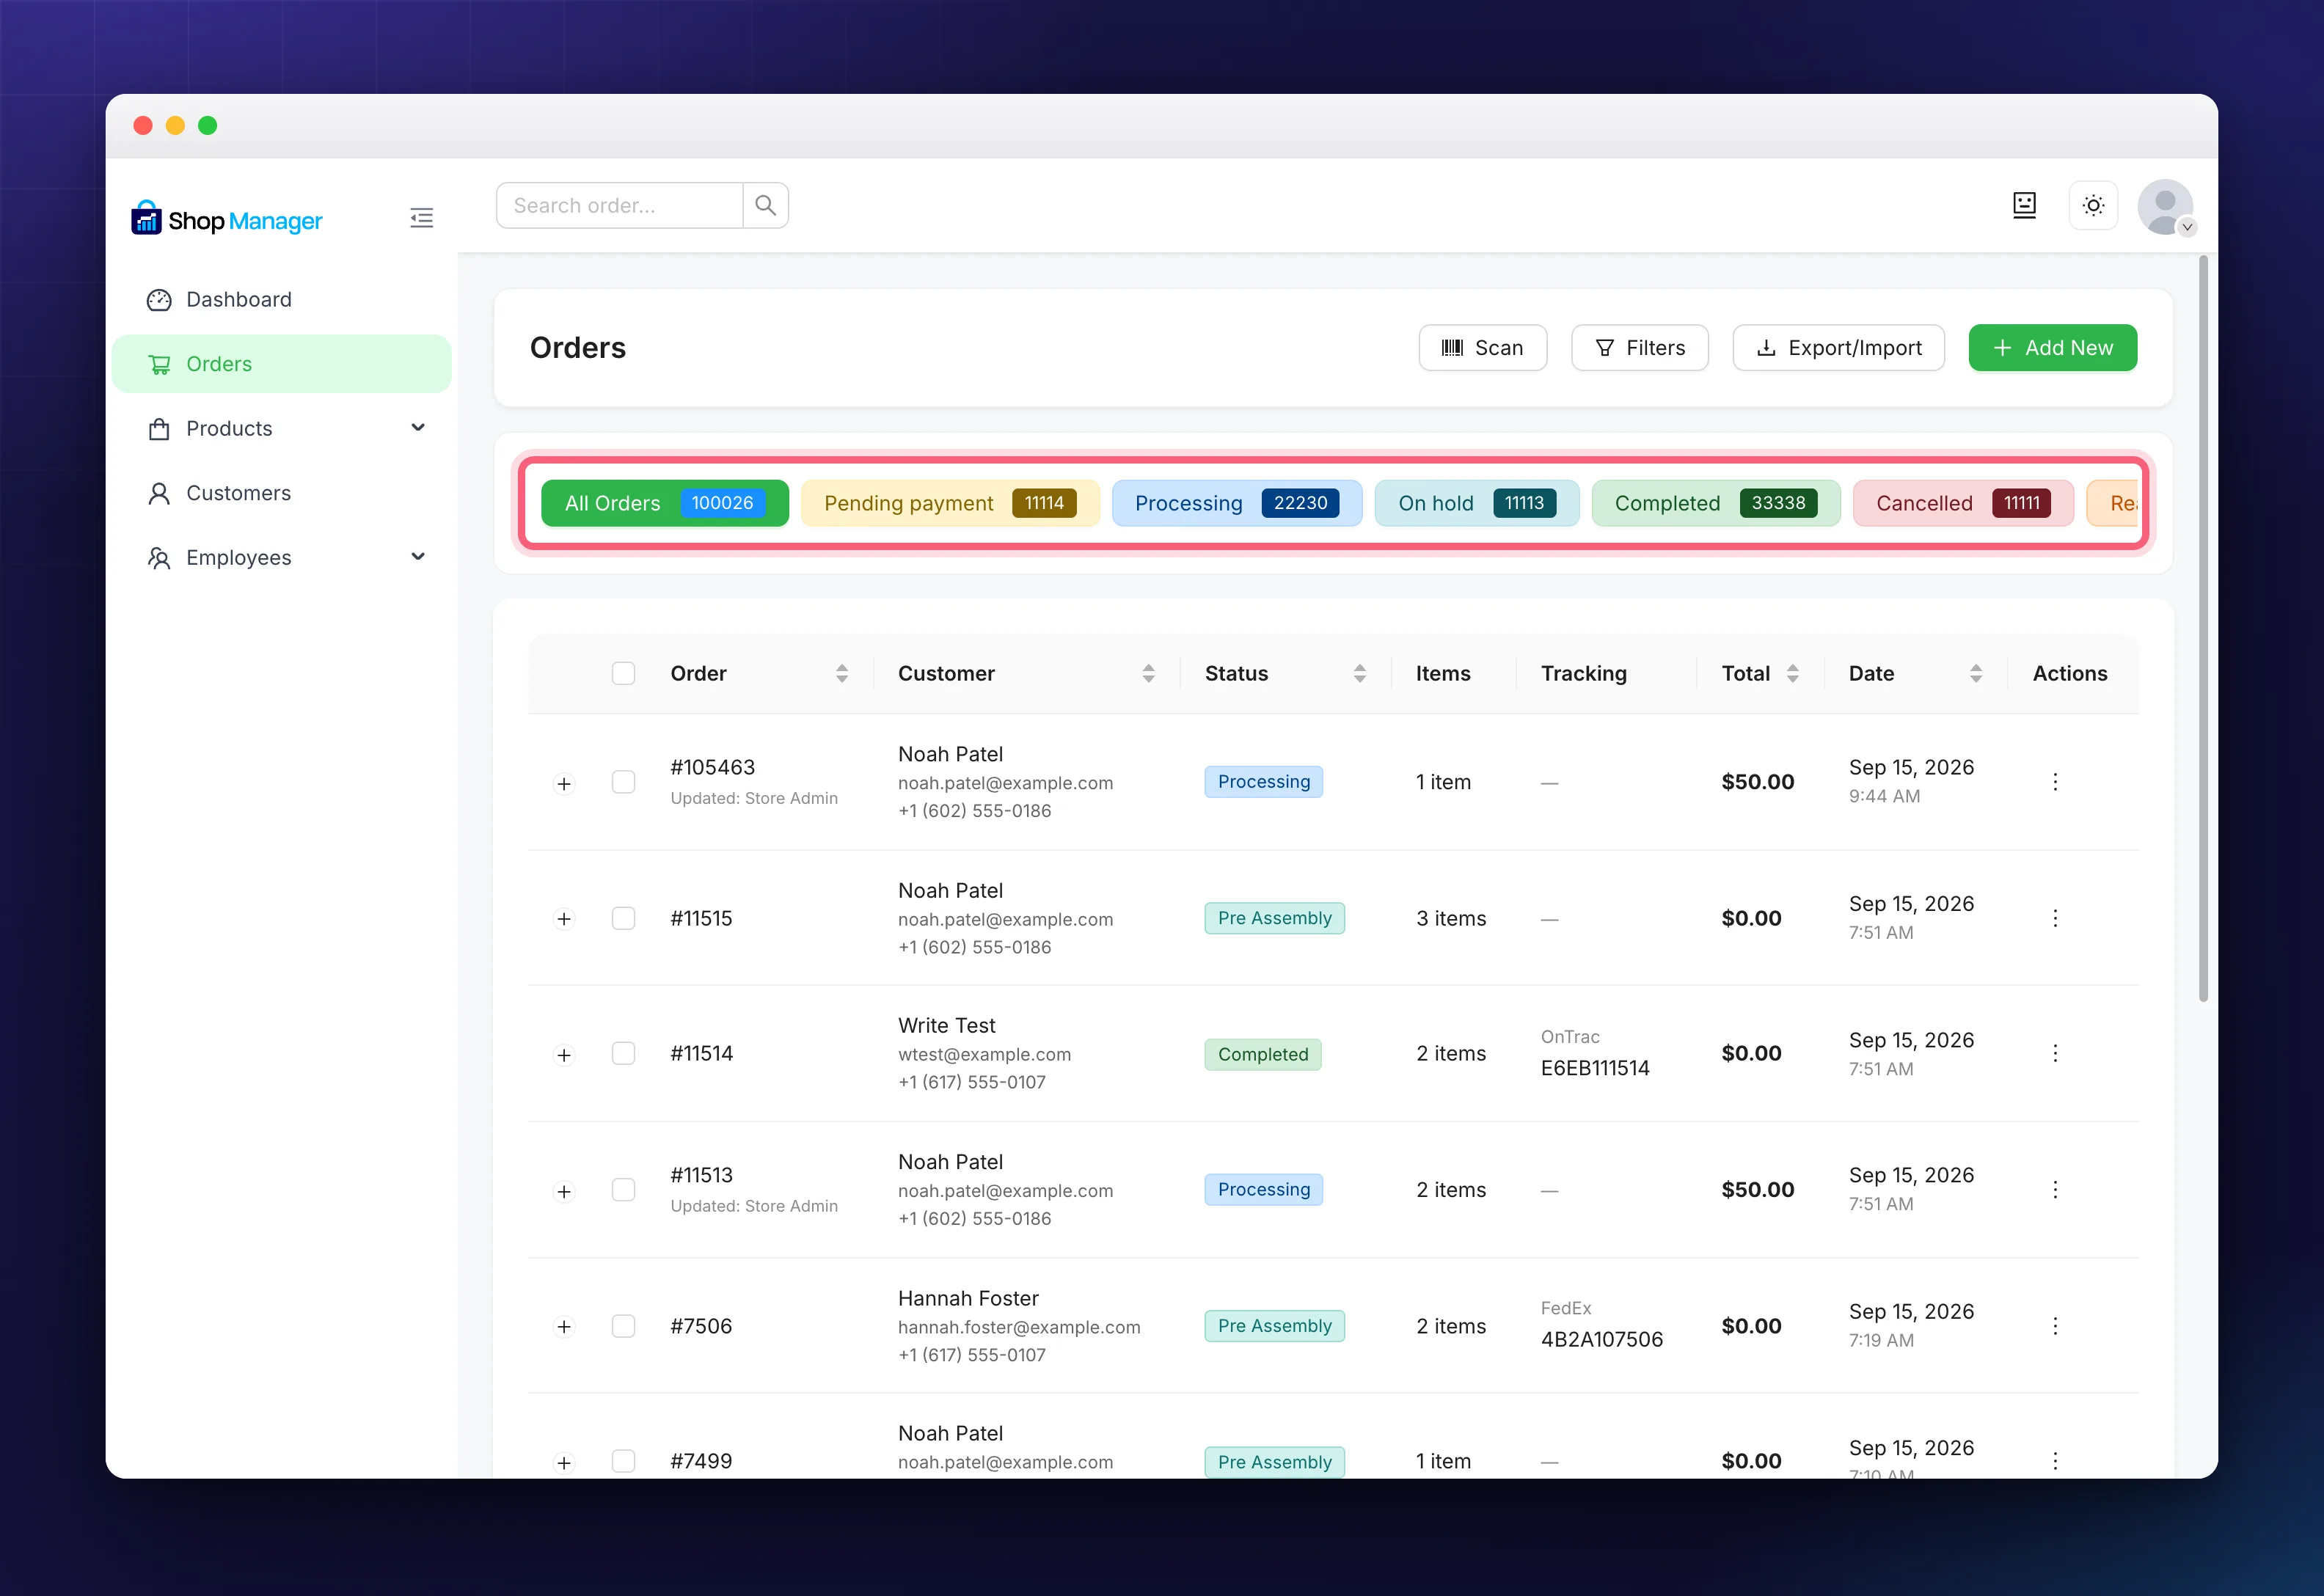
The counts come from your store, so they update as orders move. This row is the quickest way to filter in WooCommerce order management, and it scrolls sideways when a store has many statuses, including any custom ones.
Note: Custom order statuses appear here too, but using them to filter or change orders is a Pro feature. See WooCommerce Custom Order Status.
Searching for an Order
To find a specific order, use the search box in the dashboard header (labelled “Search order…”). Type an order number or customer detail and press Enter. The Orders screen then shows “Search Results for …” with the matching orders.
That one box is not limited to order numbers. It matches:
- the order number, however large your store has grown
- a billing email address
- a phone number, from four digits upwards, ignoring brackets, spaces and dashes
- a first or last name, or both together
- a tracking number, so a customer quoting their AWB is enough to find the order
Viewing Order Details
Click any order number to open its Order Details page, where you can see the customer, line items, totals, addresses, and (with the right permissions) take actions like changing the status, resending emails, or generating an invoice.
Bulk Actions
Need to update many orders at once? Tick the checkboxes next to the orders you want. A bulk-actions bar appears showing how many are Selected, along with these tools (depending on your permissions):
- Bulk Actions dropdown:
- Change Status: set the selected orders to any built-in status. Custom statuses are Pro.
- Move to Trash: send the selected orders to the trash.
- Add Tracking: add a carrier and tracking number to every selected order at once. Needs the Shipping & Tracking module.
- Shipping label button: opens printable labels for the selected orders. It is named after your own Document Title in the shipping label settings, so it reads “Shipping Label” until you rename it.
- Print button: opens a printable sheet for the selected orders. It carries your own Document Title from the print settings, which is why the screenshot below says “Packing Slip”.
- Generate Invoices: create a combined PDF for the selected orders (Pro).
- Resend Email: pick an email type and resend it to all selected orders.
- Clear Selection: deselect everything.
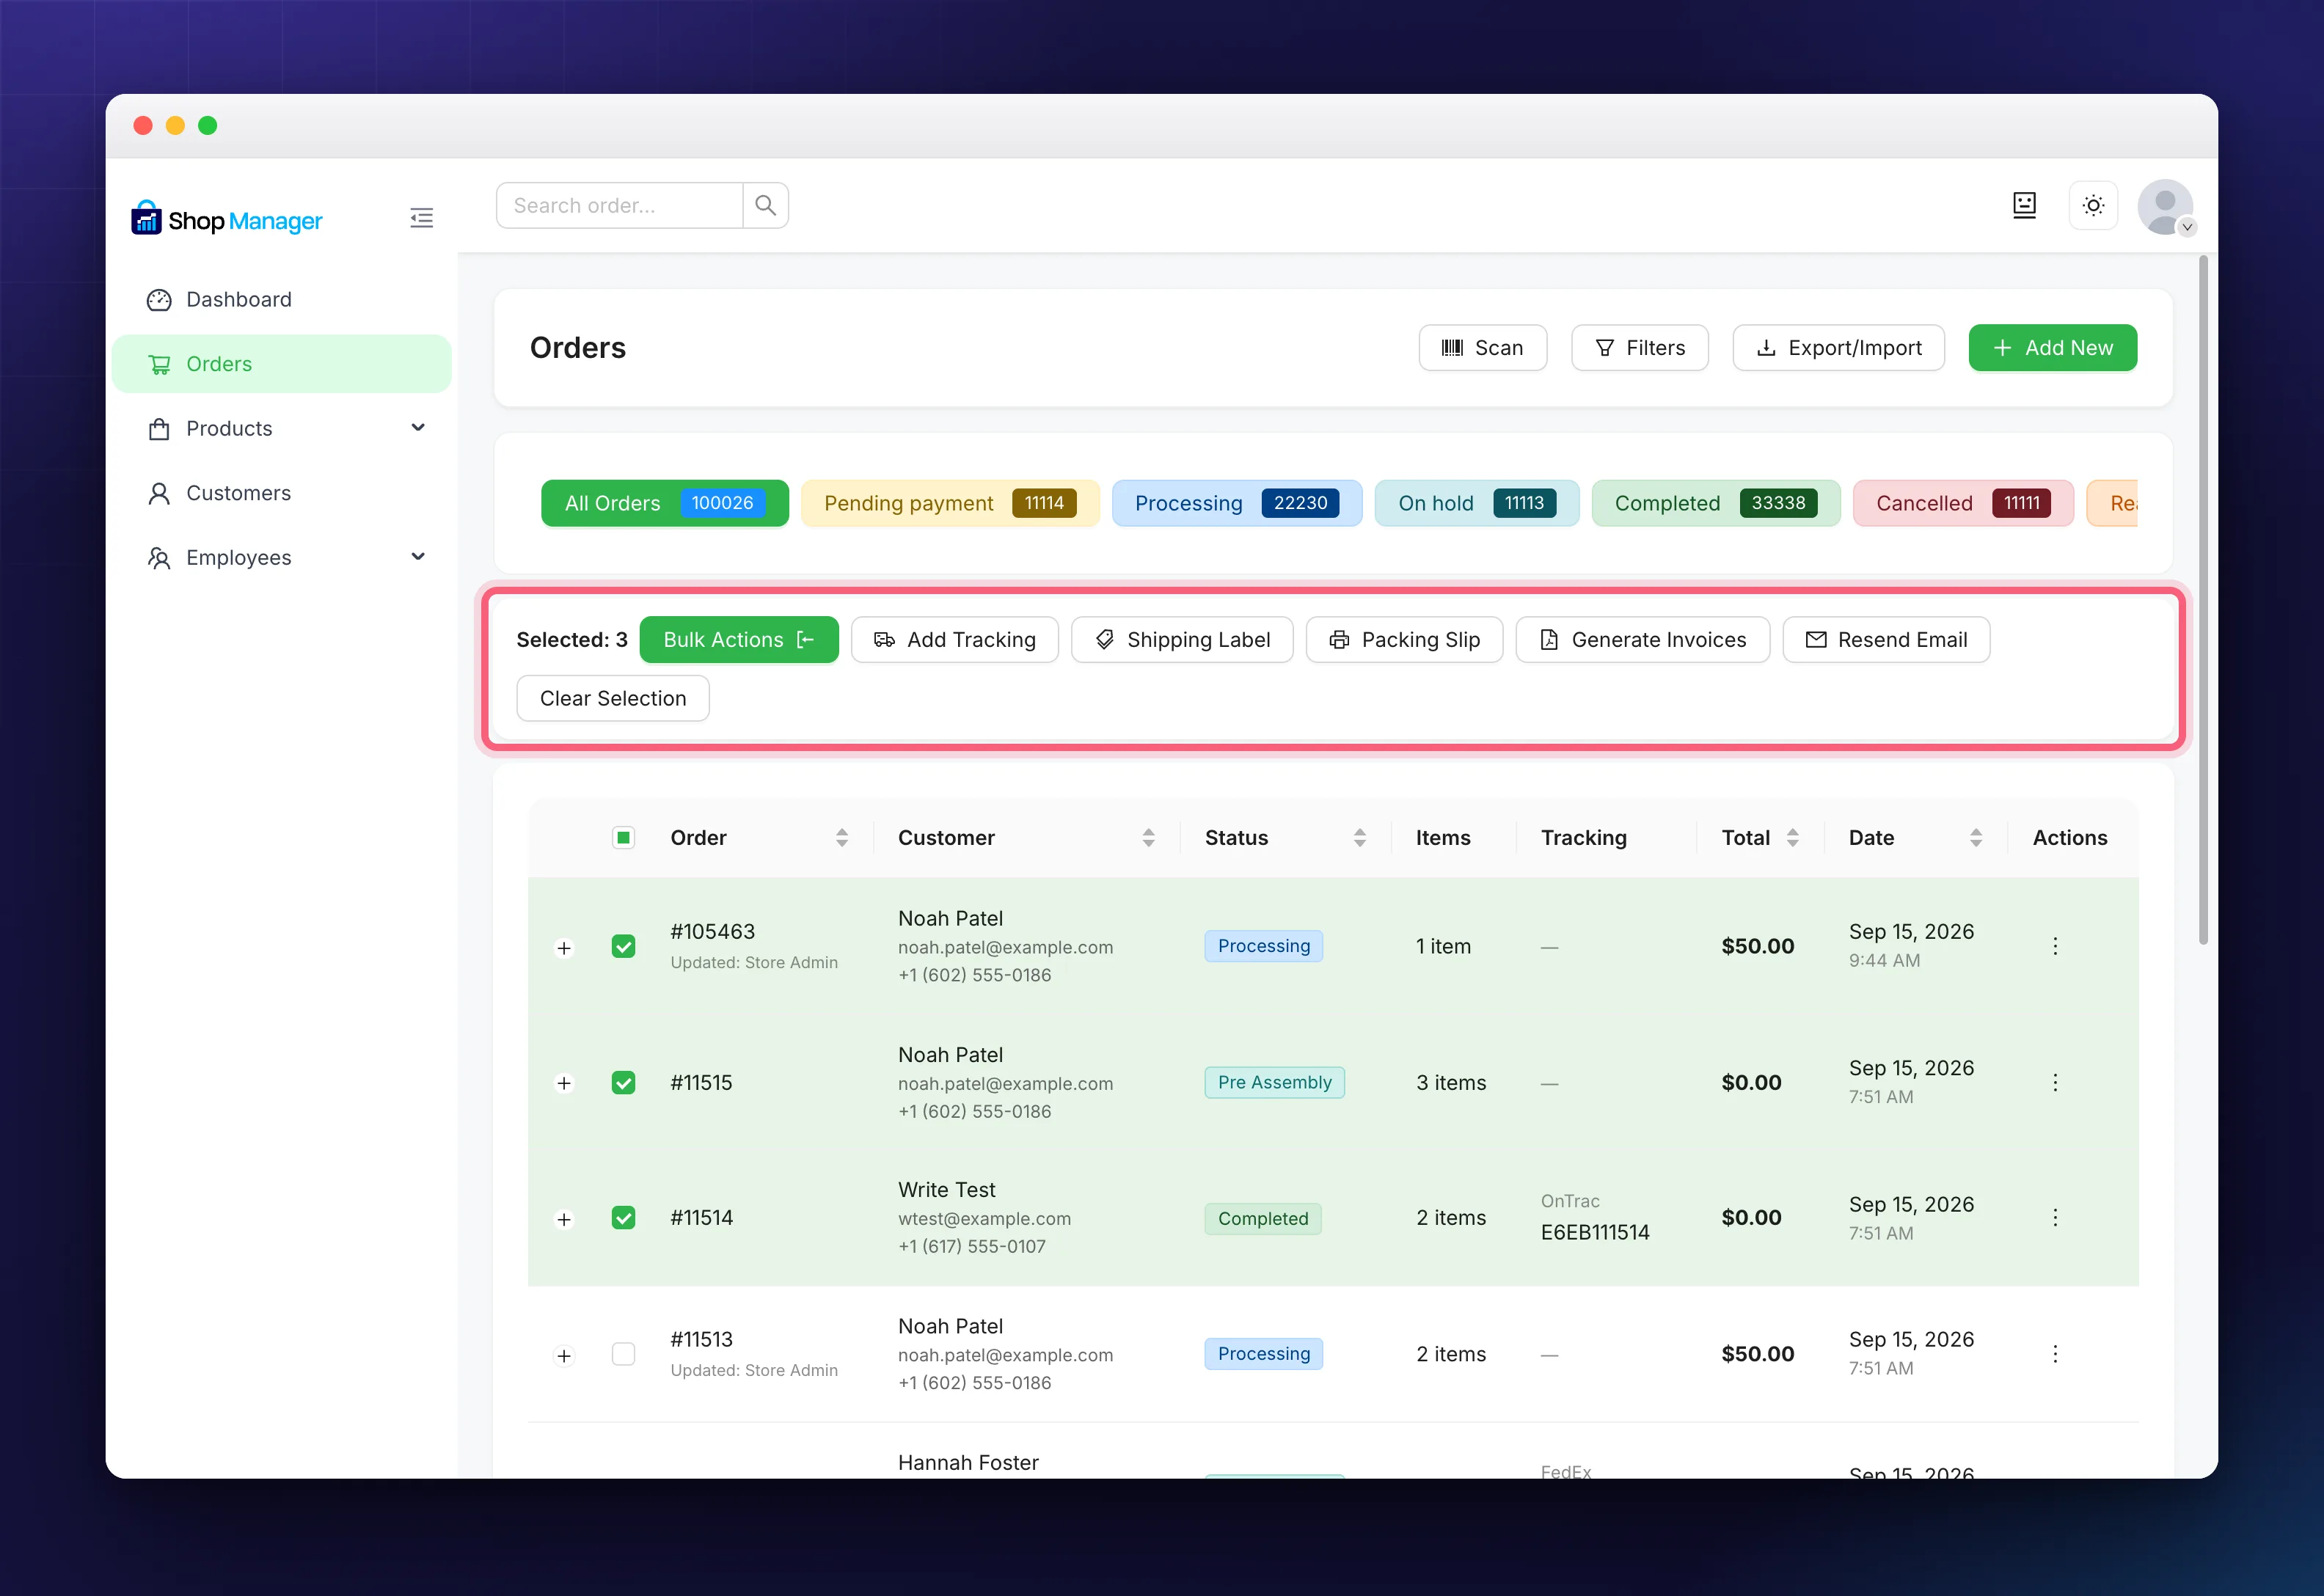
Which bulk buttons appear in WooCommerce order management depends on your role and on which modules are switched on, so a store without Shipping & Tracking will not see Add Tracking or the label button. The store above runs Pro, so Generate Invoices is unlocked; on the free plugin the same button carries a PRO badge.
Tip: Bulk status changes are the fastest way to move a batch of orders from “Processing” to “Completed” after a fulfillment run.
Exporting Orders to CSV
- (Optional) Select specific orders, or leave none selected to export the whole current view.
- Click Export/Import → Export.
- A file named
orders-export.csvdownloads to your computer.
The export respects your current view: exporting from the “Completed” tab exports completed orders, and exporting from Trash exports trashed orders.
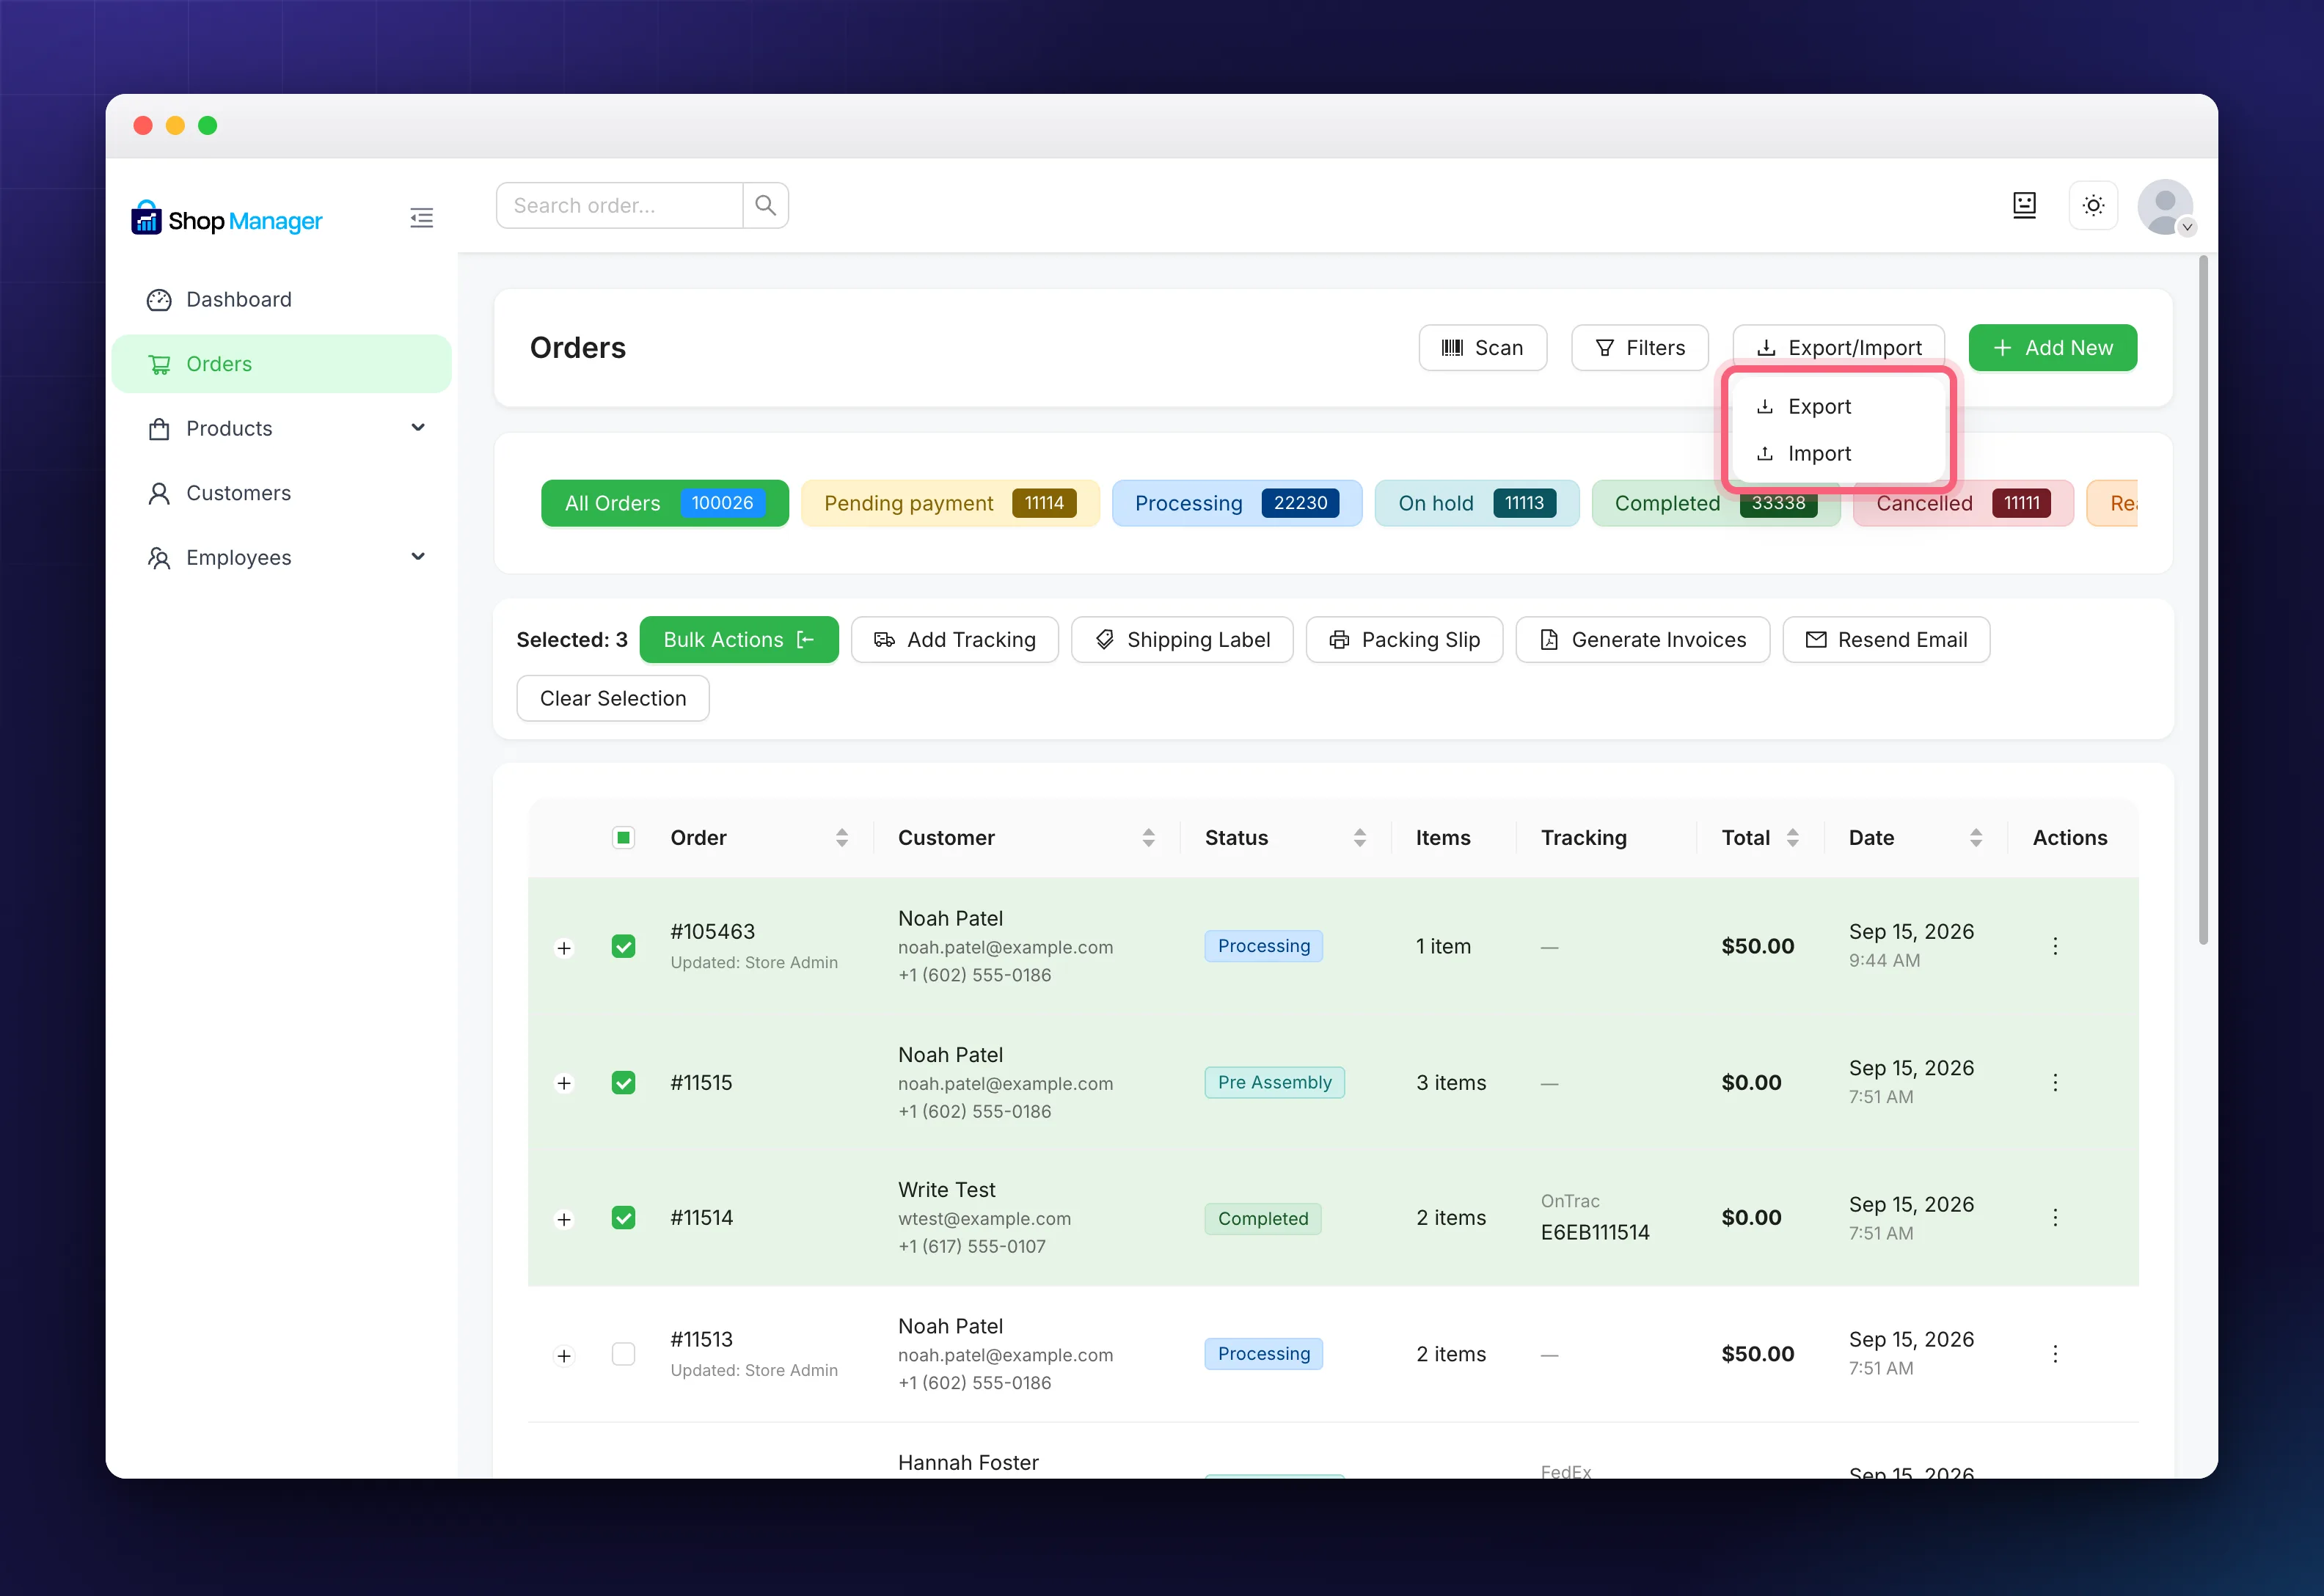
Export and Import share one button in the header of the WooCommerce order management screen. Export writes a CSV of whatever you are currently looking at; Import is not available yet.
Note: Import is listed as “coming soon” and isn’t available yet.
The Trash
Trashing an order doesn’t delete it right away, it moves it to the Trash tab. From there you can:
- Restore from Trash: return orders to their previous status.
- Delete Permanently: remove them for good. This cannot be undone.
Both are available as bulk actions inside the Trash view.
Troubleshooting
My orders list is empty.
Check the active status tab, you may be on a status with no orders. Click All, and clear any active filters.
The Export button does nothing / no file downloads.
Check that your browser isn’t blocking the download, and confirm your role has the export permission. Try again without a status filter.
I don’t see the Add New or Export buttons.
Those require the “create orders” and “export orders” permissions. Ask an administrator to adjust your role.
Frequently Asked Questions
Does this sync with WooCommerce?
Yes. WooCommerce order management in Shop Manager reads and writes the same WooCommerce orders, so changes you make here are the real orders, not a copy.
Can my staff manage orders without wp-admin access?
Yes. Give them a role with Orders access and they can work entirely from the dashboard.
I don’t see the Filters button.
Advanced filtering is free, but it has to be switched on first in Shop Manager → Settings → Orders → Advanced Filters. See Advanced Order Filters.
Related Documentation
- How to Create WooCommerce Orders Manually: add and edit orders.
- WooCommerce Custom Order Status Made Easy: change and create statuses.
- WooCommerce PDF Invoices: Generate & Download: invoice single or bulk orders (Pro).
- Resend WooCommerce Order Emails in One Click: re-send order emails.