


 Product Layouts
 ThankRedirect
 Image Hover
 Flipbox
How to scan WooCommerce shipping labels to find and update orders
The short answer
Print your labels from Shop Manager, then click Scan above the order list. Choose whether a scan should just find the order or change its status, then scan each label with a USB barcode scanner. The screen lists every result, and the box stays ready for the next parcel. This is free.
Noor's story
Runs the packing room for a toy store. Noor is a made-up example.
Noor runs the packing room for a small toy store. At five o'clock a trolley of parcels waits by the door.
Before they leave, each order has to be marked Completed. So she reads a number off a label and types it into the search box. She opens the order, changes the status and saves.
Forty parcels later, she is not sure she did them all. Did she do the blue box? She walks back to the trolley and checks.
Then a parcel comes back from the courier with no reason given. Whose is it? She starts typing again.
Sound familiar?
- You type order numbers from labels by hand.
- You change order status one order at a time.
- At the end of the day you are not sure every parcel was done.
Here is how to do it
-
Print labels with a barcode
Print your shipping labels from Shop Manager. Each one has a barcode. Until an order has tracking, the barcode is the order number. Once it has tracking, the barcode is the tracking number. The scanner works with both.
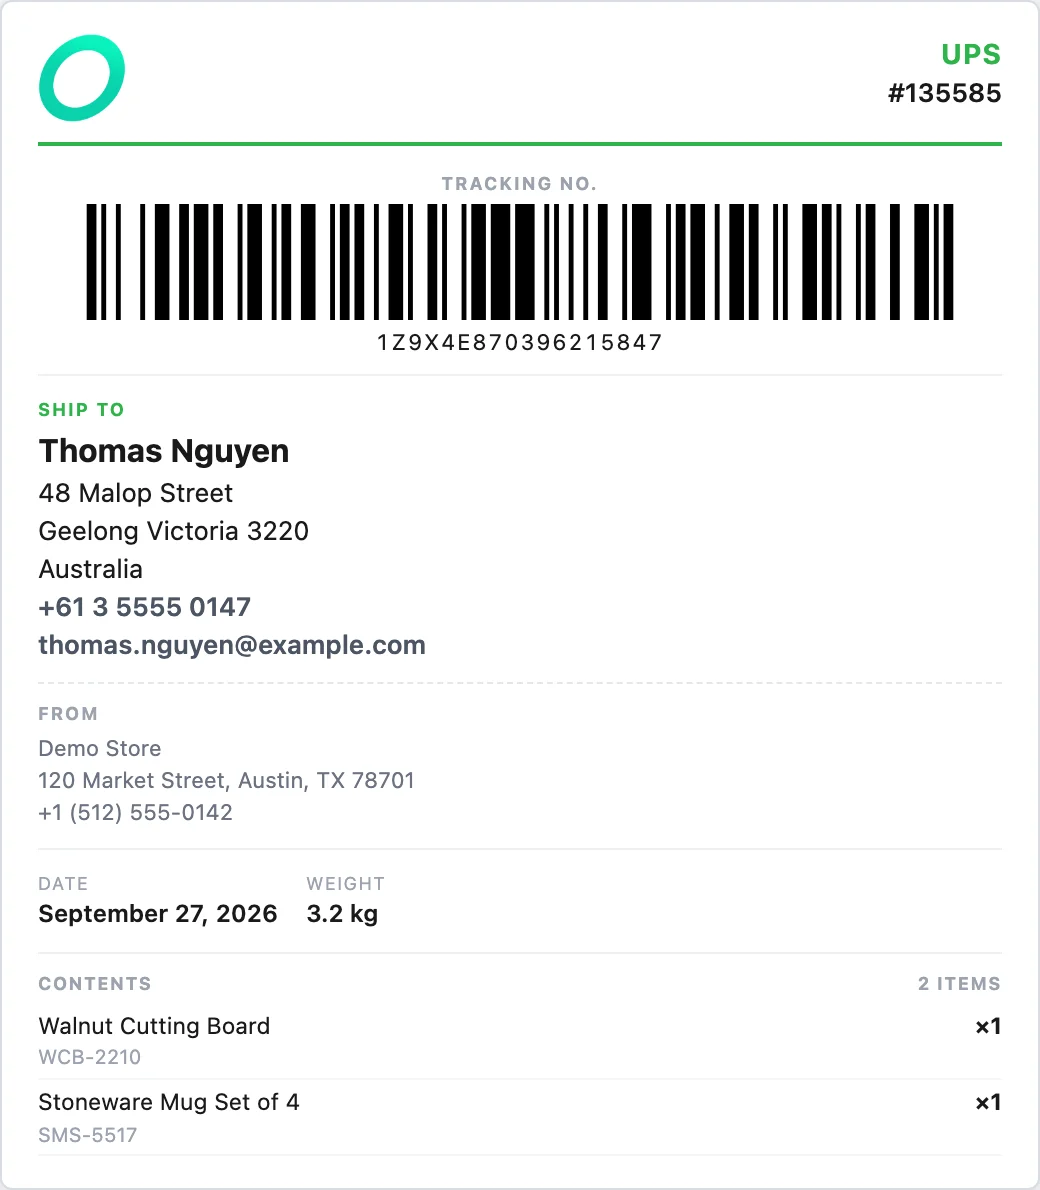
A label from our test store, with a demo store address. Nothing to click here, the barcode is the part you scan. -
Open the scan window
Plug in a USB barcode scanner. It works like a keyboard: it types the code and presses Enter. Then click Scan above your order list. The cursor is already in the marked box. You can also type an order number there and press Enter.

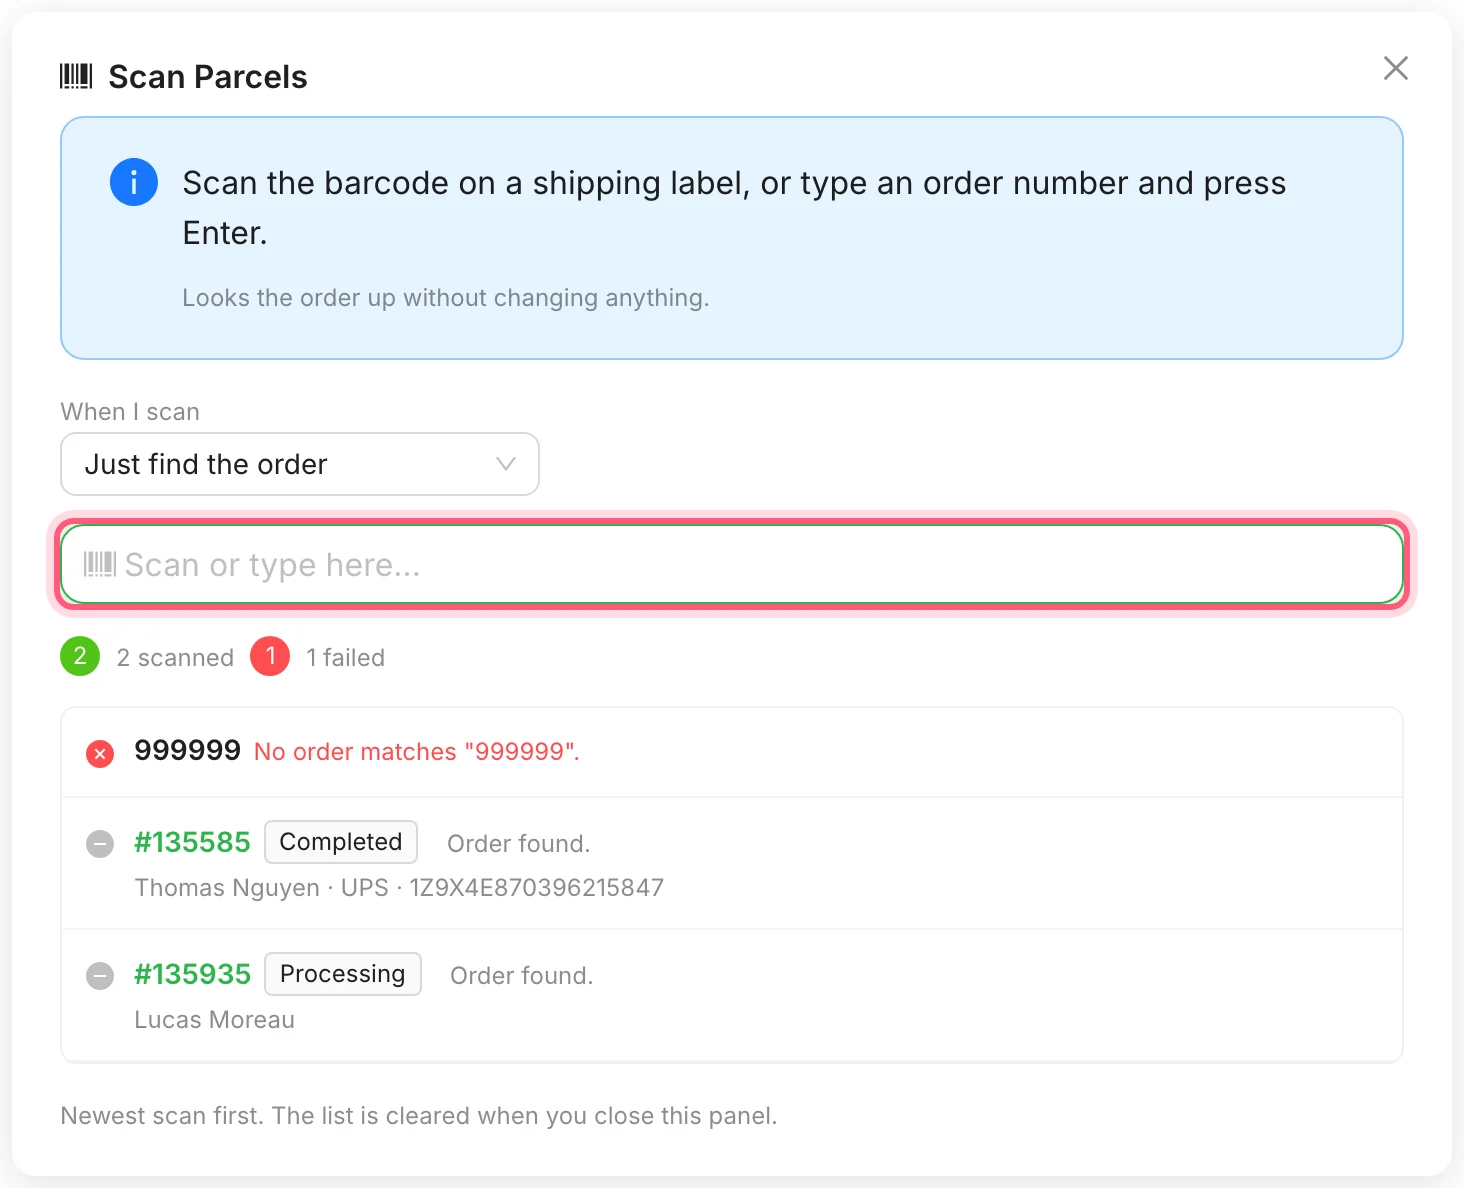
First click Scan. Then scan into the marked box. Each scan adds a line. -
Choose what a scan does
Leave it on Just find the order to look orders up and change nothing. Or choose Change order status to and pick a status, and every order you scan moves to it.
Noor picks Completed before she starts on the trolley.
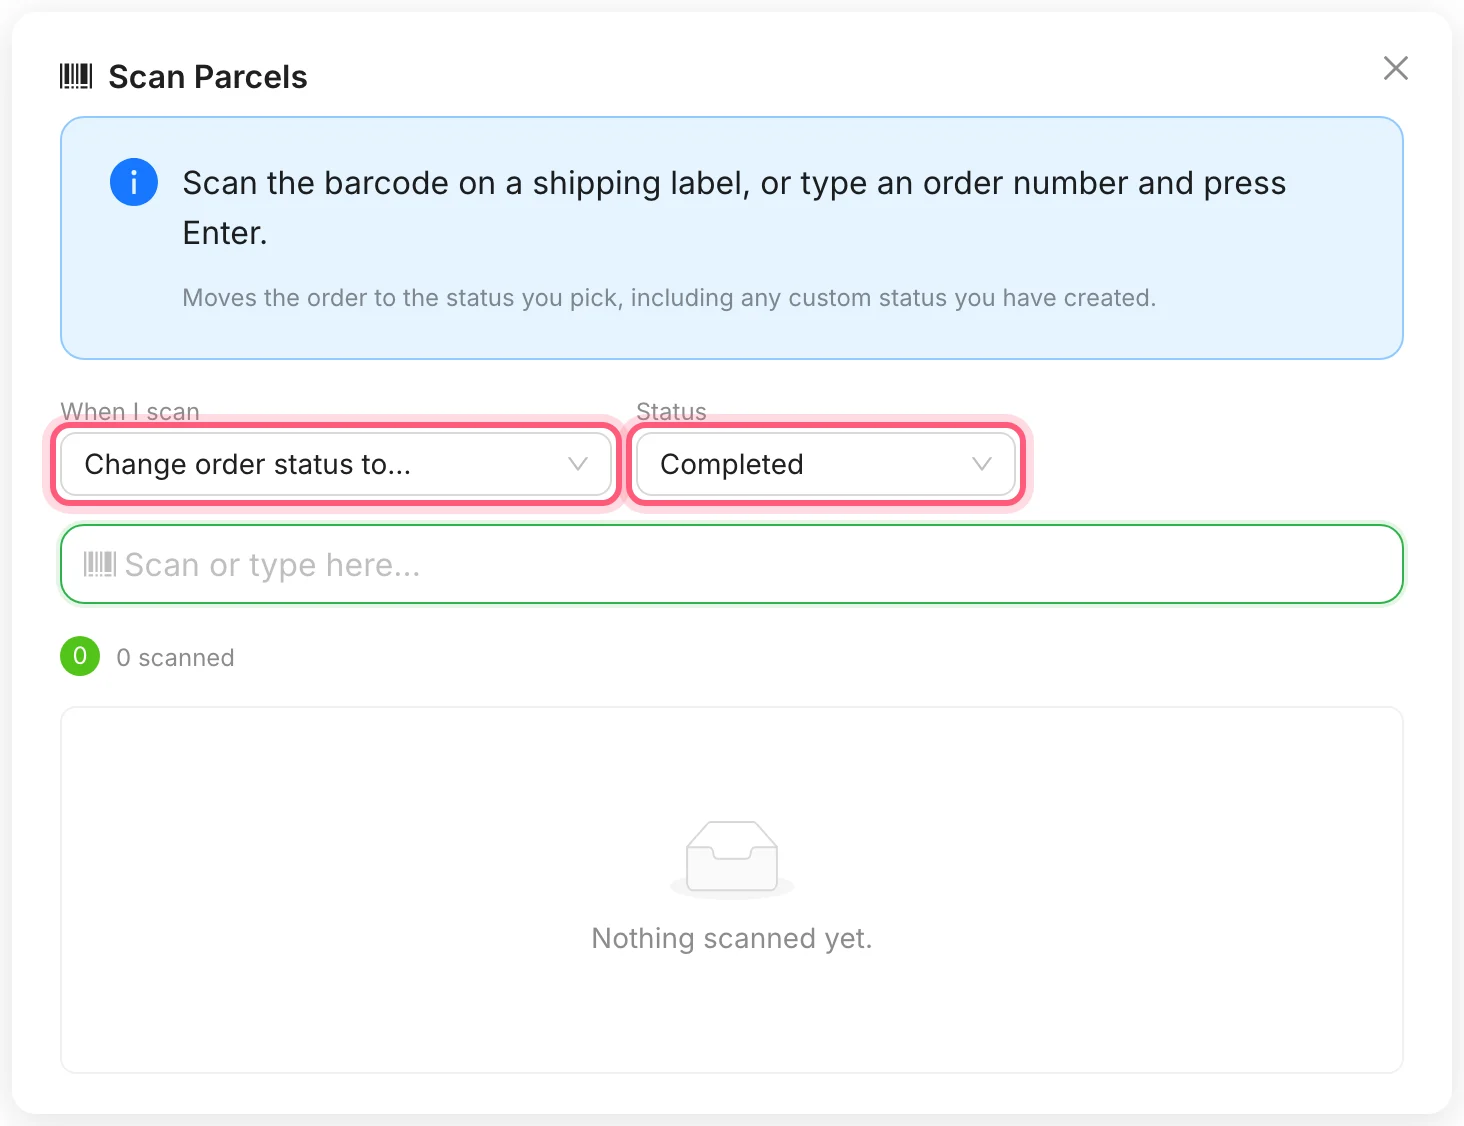
Pick from the two marked lists. Every scan now moves that order to Completed. -
Scan the whole trolley
Scan one label after another. You do not need the mouse. Each scan adds a line, so you can see what worked and what failed. An order that is not found is listed, and the next scan still works. The list clears when you close the window.
At the end, Noor checks the count on the screen. She does not have to walk back to the trolley.
-
Use your own steps, with Pro
Most stores can stop here. If you want steps like Ready to Ship, Shop Manager Pro lets you add your own order statuses. In the Shop Manager settings, open Orders and click Add New under Custom Statuses. They then show up in the scan window as well.
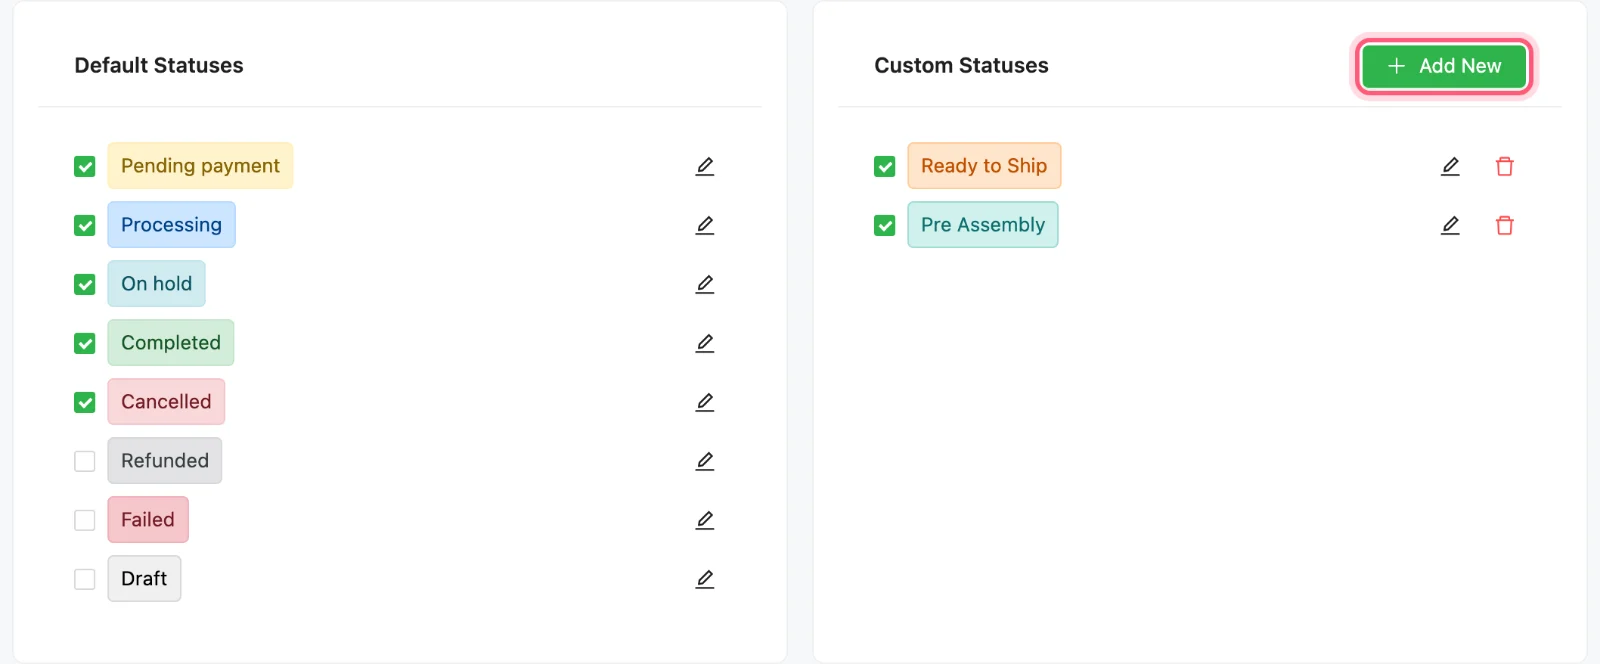
Click the marked Add New button. Custom statuses need Pro. Everything else on this page is free.
Which setting to use
| What you are doing | Choose this | What happens |
|---|---|---|
| A parcel came back | Just find the order | The order is listed, with a link to open it |
| Parcels are leaving today | Change order status to Completed | Each order moves to Completed |
| A customer reads you a number | Just find the order | You type the number instead of scanning |
How Noor's day ends
At five o'clock Noor picks up the scanner and goes down the trolley. Beep, beep, beep. One label will not match, and the screen shows her which one. She fixes that one by hand and goes home on time.
Clear your next trolley with a scanner
Shop Manager is free on WordPress.org. If you already have a USB scanner, you can try this on your next batch.
What you need
- Plan
- Free (your own statuses need Pro)
- Scanner
- A USB barcode scanner, or type the numbers
- Barcode
- Code 128, on Shop Manager labels
- Permission
- Shipping & Tracking
Features used on this page
- Scan a label to find the order
- Shipping labels with scannable barcodes
- Tracking numbers for 151 couriers
- Order statuses that match how you actually work
Checked against the plugin in .
Questions people ask
Which barcode scanner do I need?
A USB scanner that types what it reads, as most do, and that reads Code 128. The window needs nothing else from the scanner.
Can I scan with my phone camera?
No. There is no camera scanner. On a phone you can type the order number into the same box.
Will customers get an email when I scan?
If a scan changes the status, WooCommerce treats it like any other status change and sends the email you have set up for that status.
What if I scan the same parcel twice?
It is listed as already done and nothing goes wrong, so you can carry on with the next parcel.
Can staff use the scanner?
Yes. The ready-made Fulfillment Staff role has the Shipping & Tracking permission this needs.
Can I search for a tracking number without the scan window?
Yes. The search box for orders also finds tracking numbers.
More stories
- The courier comes at 4. You have 20 boxes packed and not one label printed. Ship a whole day of orders at once Free
- Thirty boxes to pack, and your slips still print one order at a time. Print a batch of packing slips Free
- Everyone uses your login. Something changed last night, and nobody knows who did it. Give staff access, keep your password Free