How to Install & Activate Image Hover Effects Ultimate Free
Ready to install and activate Image Hover Effects Ultimate? The whole thing takes less than 5 minutes. This guide walks you through every step, from finding the plugin to seeing your first hover effect on your site. You can pick whichever method suits you best, no technical skills or coding required.
How to Install & Activate Image Hover Effects Ultimate
There are three ways to install Image Hover Effects Ultimate, and all of them end with the same result: an active plugin ready to use. Most people should start with Method 1, while the upload and FTP methods are handy when you already have the plugin file or your host has special requirements.
Method 1: Install from WordPress Plugin Repository (Recommended)
This is the easiest way to install the free version directly from your WordPress dashboard.
- Log in to your WordPress admin dashboard.
- Go to Plugins → Add New from the left sidebar.
- In the search box, type “Image Hover Effects Ultimate”.
- Find the plugin by Oxilab in the results.
- Click Install Now.
- Once installed, click Activate.
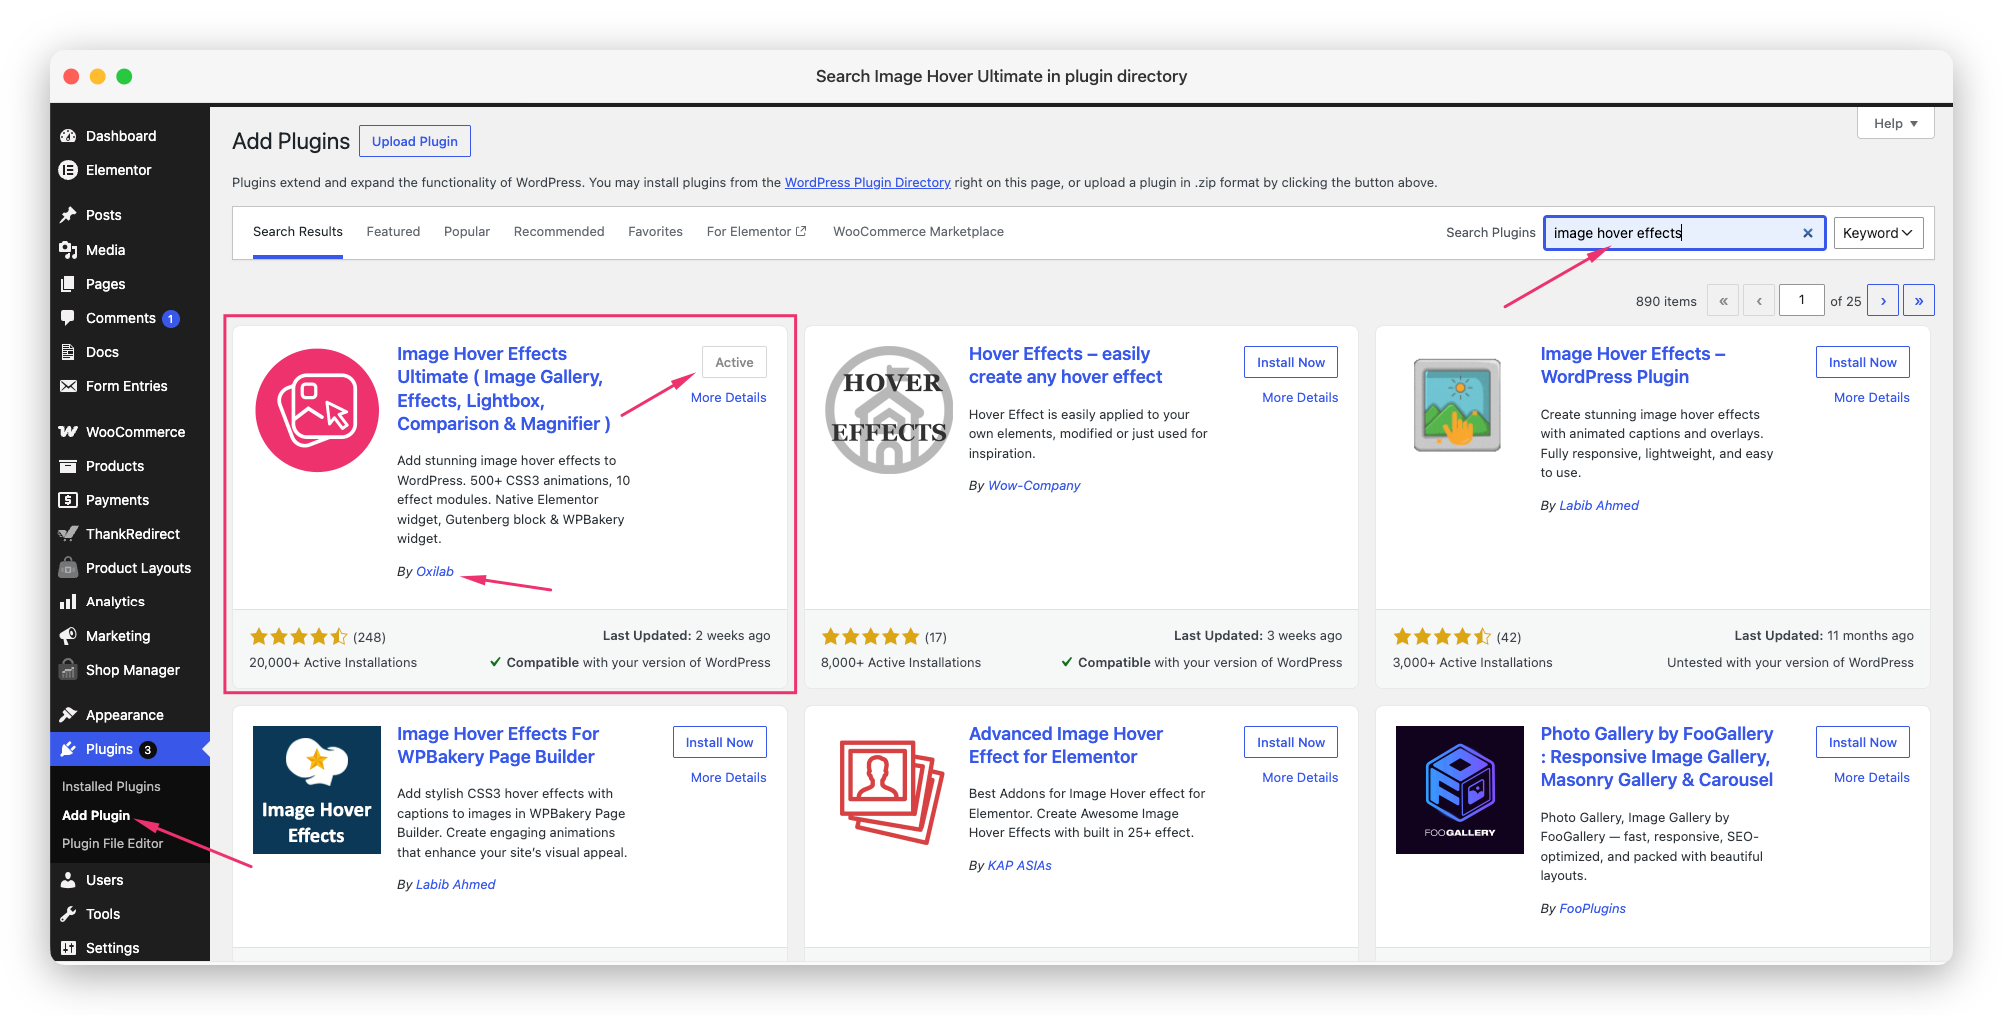
That’s it! The plugin is now active and ready to use.
Method 2: Upload Plugin ZIP File
If you downloaded the free plugin as a ZIP file, use this method.
- Download the plugin ZIP file to your computer.
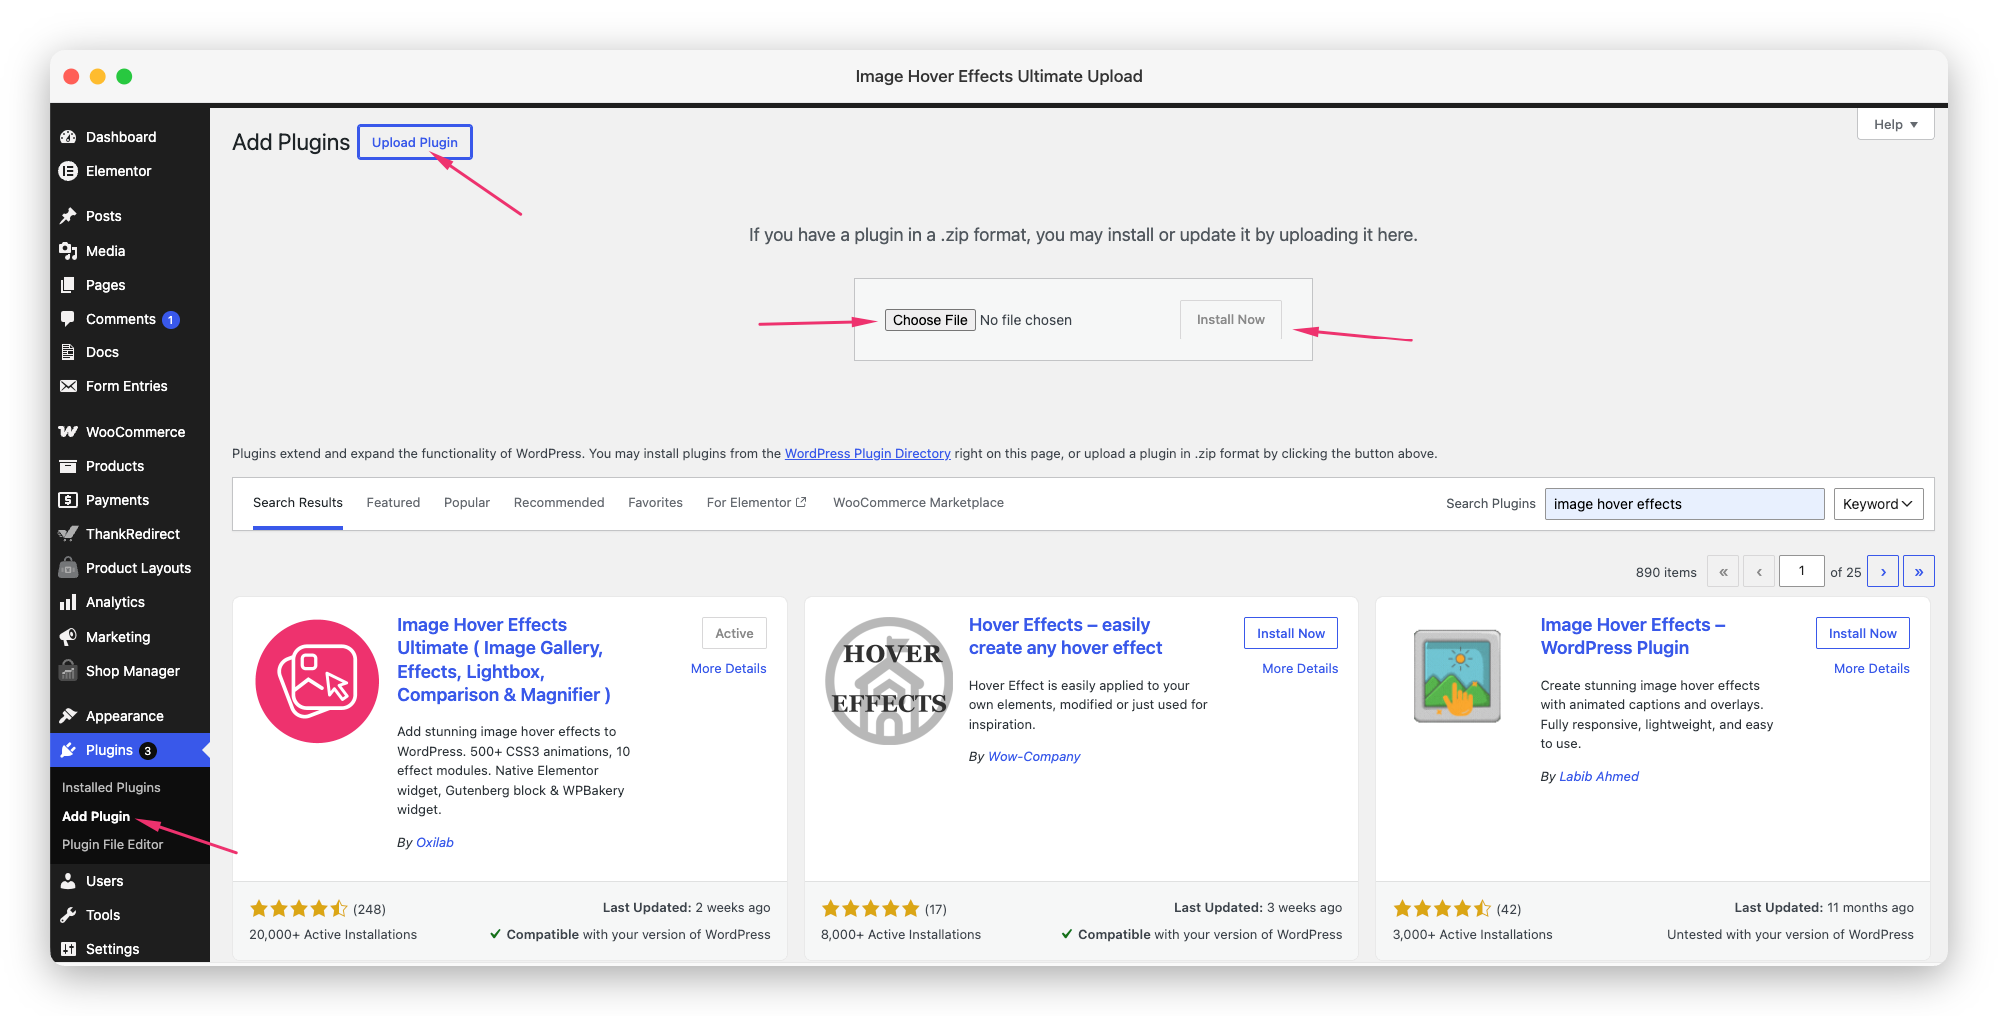
- Go to your WordPress dashboard and navigate to Plugins → Add New.
- Click the Upload Plugin button at the top of the page.
- Click Choose File and select the ZIP file you downloaded.
- Click Install Now.
- After installation completes, click Activate Plugin.
Method 3: Install via FTP (Advanced)
- Unzip the plugin ZIP file on your computer.
- Connect to your server using an FTP client (like FileZilla).
- Upload the unzipped folder to
/wp-content/plugins/on your server. - Go to your WordPress dashboard → Plugins.
- Find “Image Hover Effects Ultimate” and click Activate.
This method is best if you are comfortable working with files on your server or if the dashboard upload keeps failing.
Verifying the Installation
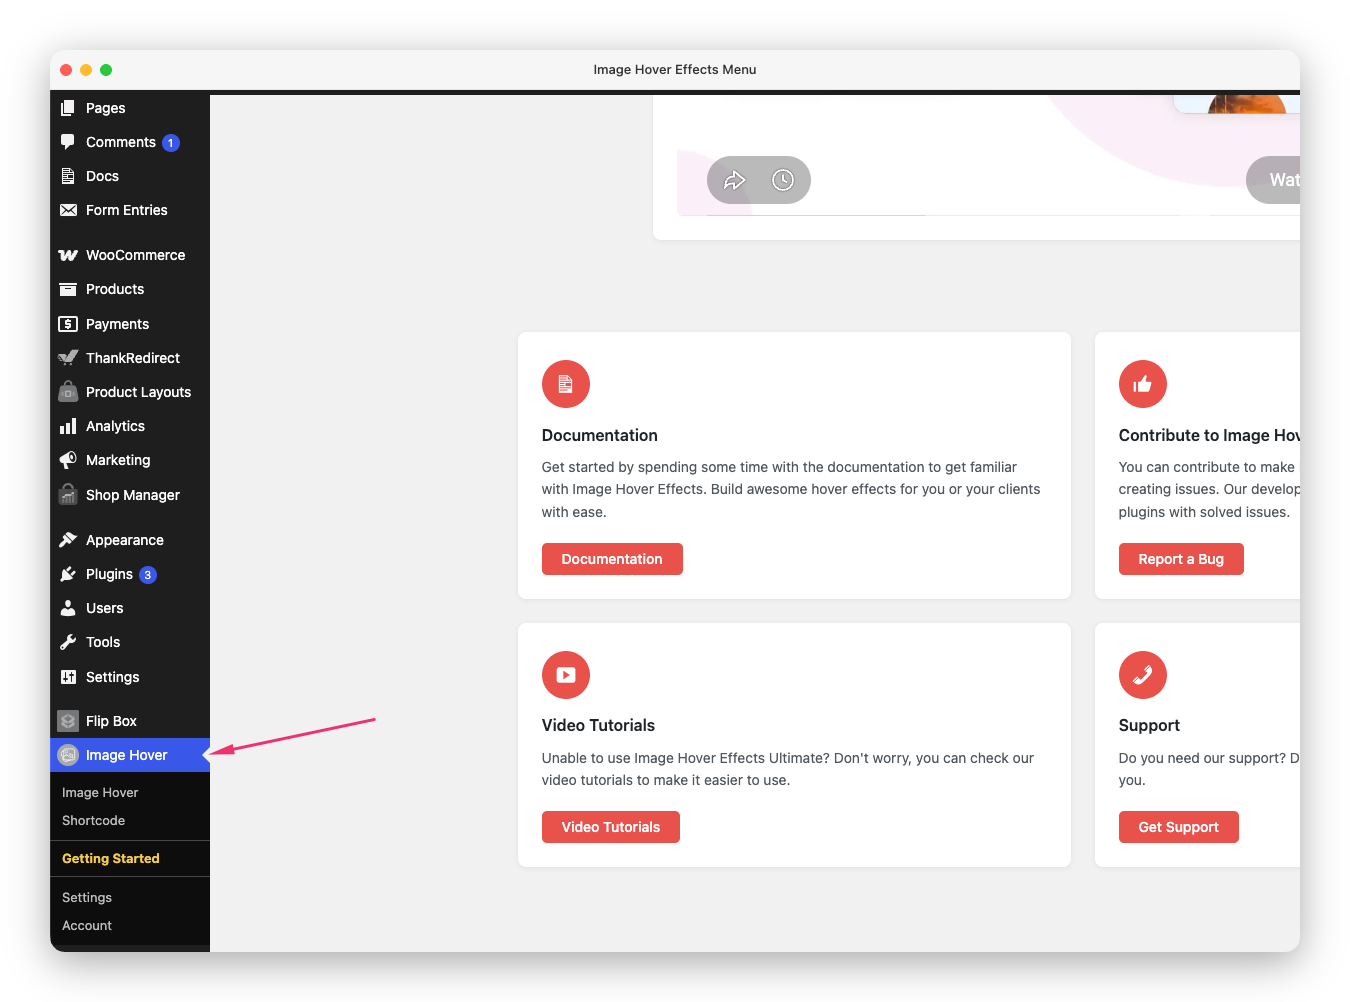
After activation, you should see a new menu item called Image Hover Ultimate in your WordPress left sidebar. If you see it, the plugin is installed and running correctly.
System Requirements
- WordPress version: 6.2 or higher
- PHP version: 7.4 or higher
If your site is older than this, ask your hosting provider to update WordPress and PHP first. Running the latest versions also keeps your site faster and more secure.
What Happens After Activation?
When the plugin activates for the first time, it automatically:
- Creates 3 database tables to store your styles and image data
- Sets up the plugin menu in your admin dashboard
- Loads a Getting Started page to help you begin
You don’t have to configure anything to get going. The free version is ready to use the moment it activates, and you can start building right away.
Next Steps: Create Your First Effect
Now that you’ve installed Image Hover Effects Ultimate, here’s where to go next:
- New to the plugin? Read What is Image Hover Effects Ultimate? for a quick overview of everything it can do.
- Ready to build? Follow Creating Your First Hover Effect to publish your first effect in about 5 minutes.
Ready to Unlock Pro Features?
If you’ve purchased a Pro license, you don’t need to install a separate plugin. See How to Install & Activate Image Hover Effects Ultimate Pro to activate your license in just a few clicks.
Troubleshooting Installation Issues
- “Are you sure you want to do this?” Your ZIP file may be too large. Contact your host to increase the upload limit, or use the FTP method instead.
- Plugin not appearing after activation: Try refreshing the page. If still missing, deactivate and reactivate the plugin.
- Error during installation: Check that your PHP version is 7.4 or higher and your WordPress version is 6.2 or higher.
- White screen or conflict: Temporarily deactivate other plugins to find the conflict, then reactivate them one by one.